How To Use Pivot Charts In Excel For Data Visualization
How To Use Pivot Charts In Excel For Data Visualization - There are a lot of affordable templates out there, but it can be easy to feel like a lot of the best cost a amount of money, require best special design template. Making the best template format choice is way to your template success. And if at this time you are looking for information and ideas regarding the How To Use Pivot Charts In Excel For Data Visualization then, you are in the perfect place. Get this How To Use Pivot Charts In Excel For Data Visualization for free here. We hope this post How To Use Pivot Charts In Excel For Data Visualization inspired you and help you what you are looking for.
“`html
Unlocking Insights with Excel Pivot Charts
Pivot charts are powerful data visualization tools in Microsoft Excel that allow you to quickly summarize and analyze large datasets. They offer a dynamic and interactive way to explore data trends, identify patterns, and gain valuable insights without complex formulas or manual calculations. By connecting to a pivot table, a pivot chart visually represents the aggregated data, making it easier to understand and interpret.
Creating a Pivot Chart: A Step-by-Step Guide
Before creating a pivot chart, you need a well-structured dataset in Excel. The data should be organized in columns with clear headers. This ensures Excel can correctly interpret the data and create meaningful aggregations.
- Select Your Data: Choose the entire dataset, including the headers.
- Insert a Pivot Table: Go to the “Insert” tab on the Excel ribbon and click “PivotTable.” A dialog box will appear.
- Choose the Data Source: Verify that the data range is correct.
- Select the PivotTable Location: Choose whether to create the pivot table on a new worksheet or an existing one. Selecting “New Worksheet” is generally recommended for better organization.
- Click “OK”: This will create an empty pivot table on the selected location.
Building the Pivot Table: Structuring Your Data
The PivotTable Fields pane will appear on the right side of the screen. This pane lists all the column headers from your dataset. To build the pivot table, you need to drag and drop these headers into the four areas: Filters, Columns, Rows, and Values.
- Filters: Fields placed here allow you to filter the entire pivot table based on specific criteria. For example, you might filter by region or product category.
- Columns: Fields placed here will appear as column headers in the pivot table. These typically represent categories you want to compare.
- Rows: Fields placed here will appear as row labels in the pivot table. These typically represent categories you want to analyze.
- Values: Fields placed here will be aggregated and displayed as the core data in the pivot table. You can choose the aggregation method, such as sum, average, count, etc.
Experiment with different arrangements of the fields to explore the data from various perspectives. For instance, you might place “Product Category” in Rows, “Sales Region” in Columns, and “Sales Amount” in Values (with Sum as the aggregation method) to see the total sales for each product category in each region.
Creating the Pivot Chart
Once the pivot table is structured, you can create the pivot chart.
- Select the Pivot Table: Click anywhere within the pivot table.
- Insert a Pivot Chart: Go to the “Insert” tab and click “PivotChart.” A dropdown menu will appear.
- Choose a Chart Type: Select the chart type that best represents your data. Common choices include column charts, bar charts, line charts, pie charts, and scatter plots. The choice depends on what you want to emphasize.
- Column and Bar Charts: Best for comparing values across different categories.
- Line Charts: Best for showing trends over time.
- Pie Charts: Best for showing proportions of a whole. Use with caution, as they can be difficult to interpret with many categories.
- Scatter Plots: Best for showing the relationship between two variables.
- Click “OK”: The pivot chart will be created, linked directly to the pivot table.
Customizing the Pivot Chart for Enhanced Visualization
Excel offers extensive customization options to improve the clarity and impact of your pivot chart.
- Chart Title: Change the chart title to accurately reflect the data being presented. Double-click on the title to edit it.
- Axis Titles: Add titles to the X and Y axes to clearly label the data being displayed.
- Data Labels: Display data labels on the chart to show the exact values. Right-click on the data series and select “Add Data Labels.”
- Legend: Customize the legend to make it easier to understand the different categories in the chart.
- Chart Styles and Colors: Experiment with different chart styles and color schemes to improve visual appeal and readability. Go to the “Design” tab under “Chart Tools” to explore different options.
- Filtering: Use the filter buttons on the chart to focus on specific subsets of the data. This is particularly useful for exploring specific trends or outliers.
- Sorting: Sort the data in the chart to highlight the highest or lowest values. Right-click on the axis or data series and select “Sort.”
- Drill-Down Functionality: Double-clicking on a data point in the pivot chart will “drill down” to show the underlying data that contributes to that data point. This allows you to explore the data at a more granular level.
Leveraging Slicers for Interactive Filtering
Slicers provide a visual and interactive way to filter pivot tables and connected pivot charts. They allow users to quickly select specific values from a field, instantly updating the chart to reflect the selected data.
- Select the Pivot Chart: Click anywhere on the pivot chart.
- Insert a Slicer: Go to the “Analyze” tab under “PivotChart Tools” and click “Insert Slicer.”
- Choose Fields for Slicers: Select the fields you want to use as filters. Each selected field will create a separate slicer.
- Customize Slicers: You can change the slicer style, number of columns, and other formatting options.
Clicking on a value within a slicer will filter the pivot chart to display only the data related to that value. You can select multiple values by holding down the Ctrl key while clicking. Using slicers significantly enhances the interactivity and exploration capabilities of your pivot charts.
Refreshing the Pivot Chart
If the underlying data changes, you need to refresh the pivot table and chart to reflect the updates.
- Select the Pivot Chart: Click anywhere on the pivot chart.
- Refresh Data: Go to the “Analyze” tab under “PivotChart Tools” and click “Refresh.” You can choose to refresh the current pivot table or refresh all pivot tables in the workbook.
Regularly refreshing the pivot chart ensures that your visualizations are always based on the most up-to-date information.
Conclusion
Pivot charts are an invaluable tool for data visualization in Excel. By mastering the techniques of creating, customizing, and interacting with pivot charts, you can unlock powerful insights from your data and make more informed decisions. Experiment with different chart types, filtering options, and customization features to discover the best ways to present your data and communicate your findings effectively. Regularly practice using pivot charts with various datasets to build your expertise and confidently leverage this powerful Excel feature.
“`
 1193×627 create chart basis pivot tables pivot charts from gyankosh.net
 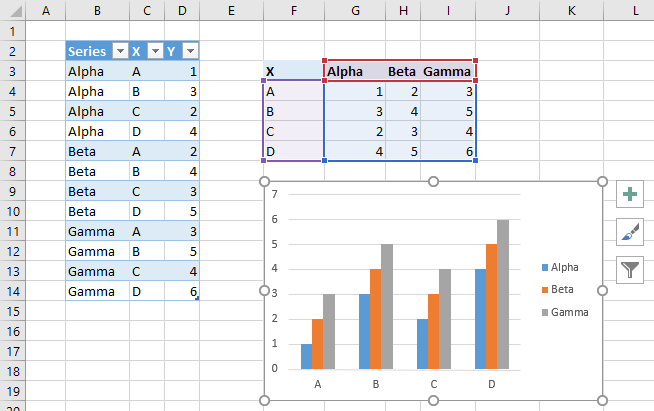 654×411 working pivot charts excel peltier tech from peltiertech.com
  1442×1080 pivot charts excel business insider from www.businessinsider.com
  1024×580 excel pivot table trick drawing charts part pivot from excelprof.com
  624×454 workshop nov pivot chart excel data from dhintro18.commons.gc.cuny.edu
 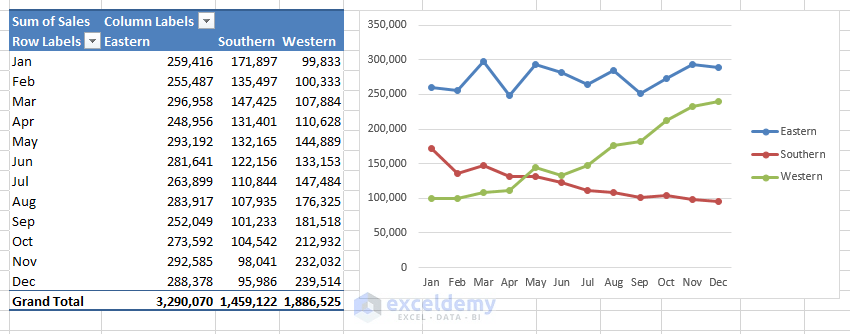 474×186 create pivot chart excel exceldemy from www.exceldemy.com
 How To Use Pivot Charts In Excel For Data Visualization was posted in December 6, 2025 at 10:38 am. If you wanna have it as yours, please click the Pictures and you will go to click right mouse then Save Image As and Click Save and download the How To Use Pivot Charts In Excel For Data Visualization Picture.. Don’t forget to share this picture with others via Facebook, Twitter, Pinterest or other social medias! we do hope you'll get inspired by ExcelKayra... Thanks again! If you have any DMCA issues on this post, please contact us!
Related For How To Use Pivot Charts In Excel For Data Visualization
Maximize Productivity with Microsof
Microsoft Excel Templates: The Ultimate Guide to Streamlining Your