How To Use Offset Function In Excel For Dynamic Ranges
How To Use Offset Function In Excel For Dynamic Ranges - There are a lot of affordable templates out there, but it can be easy to feel like a lot of the best cost a amount of money, require best special design template. Making the best template format choice is way to your template success. And if at this time you are looking for information and ideas regarding the How To Use Offset Function In Excel For Dynamic Ranges then, you are in the perfect place. Get this How To Use Offset Function In Excel For Dynamic Ranges for free here. We hope this post How To Use Offset Function In Excel For Dynamic Ranges inspired you and help you what you are looking for.
Harnessing the Power of OFFSET for Dynamic Ranges in Excel
Excel’s OFFSET function is a remarkably versatile tool for creating dynamic ranges that automatically adjust as your data changes. Instead of manually updating your formulas or charts every time you add or remove rows or columns, OFFSET provides a way to define ranges based on a starting point and offsets, making your spreadsheets more robust and adaptable.
Understanding the OFFSET Function
The OFFSET function takes five arguments:
- Reference: The starting cell from which the offset will be calculated.
- Rows: The number of rows to move up or down from the reference cell. A positive number moves down; a negative number moves up.
- Cols: The number of columns to move left or right from the reference cell. A positive number moves right; a negative number moves left.
- Height (Optional): The height of the range (in rows) to return. If omitted, it defaults to 1.
- Width (Optional): The width of the range (in columns) to return. If omitted, it defaults to 1.
The syntax is as follows:
=OFFSET(reference, rows, cols, [height], [width])The magic of OFFSET lies in its ability to return a range of cells, not just a single cell value. This allows it to be used within other functions like SUM, AVERAGE, COUNT, and more, to dynamically calculate results over a changing dataset.
Dynamic Range for a Simple Sum
Let’s illustrate with a basic example. Suppose you have sales data in column A, starting in cell A2. You want to calculate the sum of all sales figures in that column, and you want the sum to automatically update as you add more sales data.
First, we need a way to determine the number of rows containing sales data. We can use the COUNTA function for this:
=COUNTA(A:A) - 1This formula counts all non-empty cells in column A and subtracts 1 to exclude the header row (assuming your data starts in row 2). Let’s say this formula is in cell C1.
Now, use the OFFSET function to define the dynamic range:
=OFFSET(A2, 0, 0, C1, 1)Breaking this down:
- A2: The reference cell (the first cell with sales data).
- 0: We don’t want to move any rows from the starting point.
- 0: We don’t want to move any columns from the starting point.
- C1: The height of the range. This will be the number of rows containing sales data (calculated by the COUNTA formula).
- 1: The width of the range (in columns). We only need one column for sales data.
Finally, embed the OFFSET function within the SUM function:
=SUM(OFFSET(A2, 0, 0, COUNTA(A:A)-1, 1))This formula calculates the sum of the dynamic range starting at A2 and extending down to include all the rows containing sales data. As you add more rows to column A, the sum will automatically update.
Dynamic Range for Average and Other Functions
The same principle applies to other functions like AVERAGE, COUNT, MAX, MIN, etc. Simply replace SUM with the desired function. For example, to calculate the average sales:
=AVERAGE(OFFSET(A2, 0, 0, COUNTA(A:A)-1, 1))Dynamic Charting with OFFSET
OFFSET is invaluable for creating dynamic charts. Instead of selecting a fixed range for your chart data, you can use OFFSET to define a dynamic range that automatically expands as your data grows.
Suppose you have sales data in column A (starting at A2) and corresponding dates in column B (starting at B2). You want to create a line chart showing the sales trend over time. You want the chart to update automatically as you add more sales data.
- Define Named Ranges: Create named ranges for both the dates and sales data using OFFSET.
- Go to the Formulas tab and click “Define Name.”
- In the “Name” field, enter a descriptive name (e.g., “DynamicDates”).
- In the “Refers to” field, enter the OFFSET formula:
=OFFSET(Sheet1!$B$2,0,0,COUNTA(Sheet1!$B:$B)-1,1)(Replace “Sheet1” with the actual name of your sheet.)
- Click “OK.”
- Repeat this process to define a named range for the sales data (e.g., “DynamicSales”). The “Refers to” formula would be:
=OFFSET(Sheet1!$A$2,0,0,COUNTA(Sheet1!$A:$A)-1,1)
- Create the Chart: Create your chart as normal. When selecting the data source for your chart, use the named ranges you just created (e.g., `=Sheet1!DynamicDates` and `=Sheet1!DynamicSales`). Note the Sheet name is necessary in this case.
Now, as you add new dates and sales figures, the chart will automatically update to include the new data. This eliminates the need to manually adjust the chart’s data source every time your data changes.
Handling Empty Cells
The COUNTA function counts any cell that is not empty. If you have gaps in your data (e.g., empty cells in the middle of your sales data), COUNTA might not accurately reflect the true number of data points. In such cases, consider using COUNT or COUNTIF to count numeric or specific types of data.
Limitations
While OFFSET is powerful, it also has some limitations:
- Volatility: OFFSET is a volatile function. This means that it recalculates every time Excel recalculates, even if the underlying data hasn’t changed. Excessive use of volatile functions can slow down your spreadsheet.
- Understanding the Logic: The logic behind OFFSET can be tricky to grasp initially. Proper commenting and clear naming conventions can improve readability and maintainability.
Alternatives to OFFSET
In some scenarios, INDEX/MATCH or structured tables might offer better performance or readability than OFFSET. However, OFFSET remains a valuable tool in Excel’s arsenal for creating dynamic ranges and simplifying data analysis.
Conclusion
The OFFSET function is a powerful technique for creating dynamic ranges in Excel. By understanding its arguments and how to combine it with other functions, you can build spreadsheets that adapt automatically to changing data, saving you time and effort in the long run. While its volatility is a factor to consider, the benefits of dynamic ranges often outweigh this drawback, especially when combined with careful spreadsheet design.
 752×546 excel offset function formula examples video from trumpexcel.com
  612×237 excel offset function dynamic calculations xelplus leila gharani from www.xelplus.com
  1516×670 excel offset function excelfind from excelfind.com
 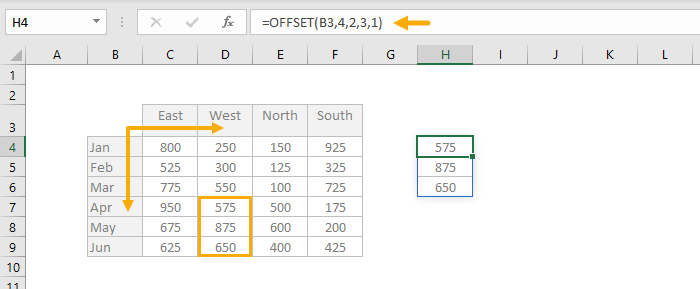 474×195 excel offset function exceljet from exceljet.net
  1161×806 offset function dynamic named ranges excel mathsfiles blog from www.mathsfiles.com
 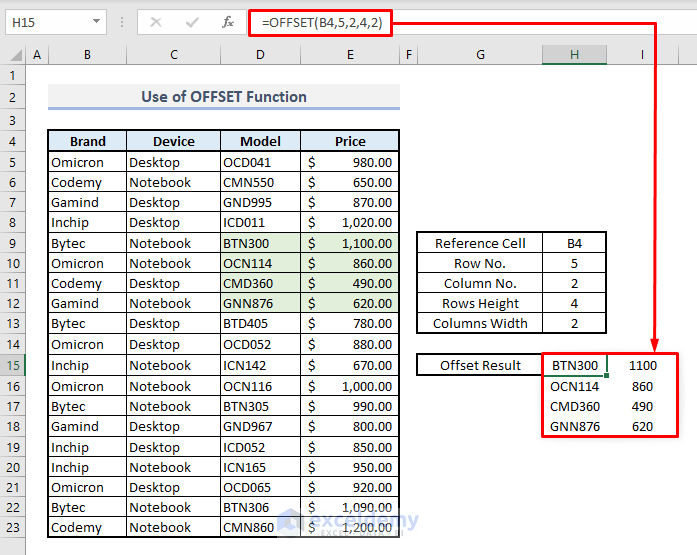 697×555 offset function create dynamic range excel from www.exceldemy.com
  515×333 excel offset function myexcelonline from www.myexcelonline.com
  640×440 excel offset function sheetgo blog from blog.sheetgo.com
  700×332 offset function excel teachexcelcom from www.teachexcel.com
 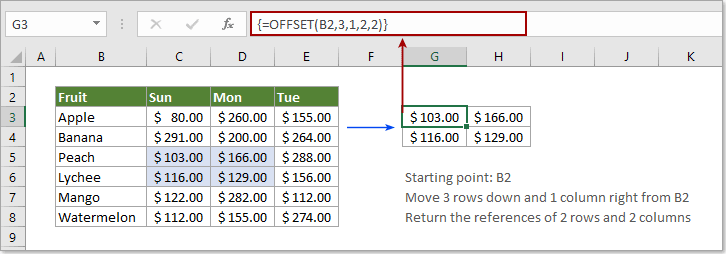 726×254 offset function excel from www.extendoffice.com
 How To Use Offset Function In Excel For Dynamic Ranges was posted in October 16, 2025 at 9:59 pm. If you wanna have it as yours, please click the Pictures and you will go to click right mouse then Save Image As and Click Save and download the How To Use Offset Function In Excel For Dynamic Ranges Picture.. Don’t forget to share this picture with others via Facebook, Twitter, Pinterest or other social medias! we do hope you'll get inspired by ExcelKayra... Thanks again! If you have any DMCA issues on this post, please contact us!