How To Add Checkboxes To Excel For Interactive Checklists
How To Add Checkboxes To Excel For Interactive Checklists - There are a lot of affordable templates out there, but it can be easy to feel like a lot of the best cost a amount of money, require best special design template. Making the best template format choice is way to your template success. And if at this time you are looking for information and ideas regarding the How To Add Checkboxes To Excel For Interactive Checklists then, you are in the perfect place. Get this How To Add Checkboxes To Excel For Interactive Checklists for free here. We hope this post How To Add Checkboxes To Excel For Interactive Checklists inspired you and help you what you are looking for.
Creating interactive checklists in Excel using checkboxes is a powerful way to manage tasks, track progress, and enhance data entry. Excel’s checkbox feature is part of its developer controls, providing a user-friendly and visually intuitive method for marking items as complete. This guide will walk you through the process of adding checkboxes to your Excel spreadsheets, linking them to cells, and using them to automate calculations or conditional formatting.
Enabling the Developer Tab
Before you can insert checkboxes, you need to make sure the Developer tab is visible in your Excel ribbon. By default, it’s hidden. Here’s how to enable it:
- Click the File tab.
- Select Options.
- In the Excel Options dialog box, click Customize Ribbon.
- On the right-hand side, under “Customize the Ribbon,” find the Developer checkbox.
- Check the Developer box and click OK.
The Developer tab will now appear in your Excel ribbon.
Inserting Checkboxes
Now that the Developer tab is enabled, you can insert checkboxes into your worksheet:
- Click the Developer tab.
- In the “Controls” group, click Insert.
- Under “Form Controls,” select the Checkbox icon (the first option).
- Click and drag on your worksheet to draw the checkbox. The size you draw will determine the size of the checkbox.
A checkbox will be inserted into your spreadsheet. You can move it around by clicking and dragging it. You can also resize it by dragging the handles that appear when you select the checkbox.
Editing the Checkbox Text
By default, a checkbox will be inserted with the text “Check Box 1” (or a similar numbered name). You’ll likely want to change this to something more descriptive of the task or item it represents.
- Right-click on the checkbox.
- Select Edit Text.
- The text will become editable. Delete the existing text and type in your desired label.
- Click outside the checkbox to finish editing.
Make sure the text is concise and clearly indicates what the checkbox is for. Consider using action verbs to make the list more actionable (e.g., “Approve Proposal,” “Send Email,” “Review Document”).
Linking Checkboxes to Cells
The real power of checkboxes comes from linking them to specific cells. This allows you to track the state of the checkbox (checked or unchecked) in the cell and use that data in formulas or conditional formatting. Here’s how to link a checkbox to a cell:
- Right-click on the checkbox.
- Select Format Control.
- In the Format Control dialog box, go to the Control tab.
- In the “Cell link” field, either type in the cell address (e.g., A1) or click the cell selector icon (a small spreadsheet icon) and then click on the cell you want to link to.
- Click OK.
Now, when you check the checkbox, the linked cell will display the value TRUE. When you uncheck the checkbox, the linked cell will display the value FALSE.
Important Considerations for Cell Linking:
- Hidden Cells: You might want to hide the linked cells to keep your spreadsheet clean. To hide a cell, right-click on the cell or range of cells and select “Hide.”
- Strategic Placement: Consider placing the linked cells in a column to the right of your checkboxes, or in a completely separate area of the sheet, to maintain readability.
- One-to-One Relationship: Each checkbox should typically be linked to a separate cell. Linking multiple checkboxes to the same cell will result in unpredictable behavior.
Creating a Checklist
Let’s put it all together to create a basic checklist:
- In column A, list the tasks you want to include in your checklist (e.g., “Create Project Plan,” “Gather Requirements,” “Develop Prototype”).
- In column B, insert a checkbox next to each task.
- Link each checkbox to a corresponding cell in column C. For example, the checkbox next to “Create Project Plan” would be linked to C1, the checkbox next to “Gather Requirements” would be linked to C2, and so on.
You now have a functional checklist. Checking a box will display TRUE in the linked cell, and unchecking it will display FALSE.
Using Checkboxes in Formulas
The real power of linked checkboxes comes from using them in formulas. Here are a few examples:
- Counting Completed Tasks: You can use the `COUNTIF` function to count the number of checked boxes (TRUE values).
`=COUNTIF(C1:C10,TRUE)` This formula will count the number of TRUE values in the range C1:C10, which represents the number of checked checkboxes. - Calculating Percentage Completion: You can calculate the percentage of tasks completed using the `COUNTIF` and `COUNTA` functions.
`=(COUNTIF(C1:C10,TRUE)/COUNTA(A1:A10))*100` This formula divides the number of TRUE values (completed tasks) by the total number of tasks and multiplies by 100 to get the percentage. - Conditional Formatting Based on Checkbox State: You can apply conditional formatting to highlight completed tasks. For example, you can change the background color of the task description when its corresponding checkbox is checked.
- Select the task description cell (e.g., A1).
- Go to the Home tab and click Conditional Formatting.
- Select New Rule…
- Choose “Use a formula to determine which cells to format.”
- In the formula box, enter a formula that references the linked cell (e.g., `=C1=TRUE`). Make sure to adjust the cell reference based on the cell linked to the corresponding checkbox.
- Click the Format… button and choose the formatting you want to apply (e.g., a background color, a strikethrough effect).
- Click OK twice.
- Repeat for each task. You can use the “Format Painter” tool to quickly copy the conditional formatting to other cells in column A, but make sure to adjust the cell reference in the formula for each row.
Grouping Checkboxes (Optional)
If you have a large number of checkboxes, you might want to group them visually to improve organization. While Excel doesn’t have a direct “grouping” feature for form controls like checkboxes, you can achieve a similar effect using borders and cell shading.
- Select the range of cells containing the checkboxes you want to group.
- Go to the Home tab and click the Borders dropdown.
- Choose the type of border you want to apply (e.g., “Outside Borders”).
- Optionally, you can also apply a background color to the selected cells to further visually group them.
Troubleshooting Tips
- Checkboxes Not Working: Make sure the Developer tab is enabled. Double-check that the checkboxes are properly linked to cells. Ensure that you are not accidentally editing the cell while trying to click the checkbox.
- Checkboxes Moving When Scrolling: Form controls, including checkboxes, can sometimes move unexpectedly when scrolling if the “Move and size with cells” option is not set correctly. To fix this, right-click on the checkbox, select “Format Control,” go to the “Properties” tab, and choose “Move and size with cells.”
- “Object cannot be inserted” Error: This error can sometimes occur when inserting form controls. Try closing and reopening Excel. If that doesn’t work, try repairing your Office installation.
By following these steps, you can effectively add checkboxes to your Excel spreadsheets and create interactive checklists for task management, progress tracking, and more. The ability to link checkboxes to cells and use them in formulas unlocks a wide range of possibilities for automating and enhancing your spreadsheet workflows.
 800×661 add checkboxes excel howtoexcelnet from howtoexcel.net
  452×398 insert checkbox excel from www.repairmsexcel.com
  721×417 insert excel checkboxes goskills from www.goskills.com
  740×356 insert checkbox excel easy step step guide from trumpexcel.com
 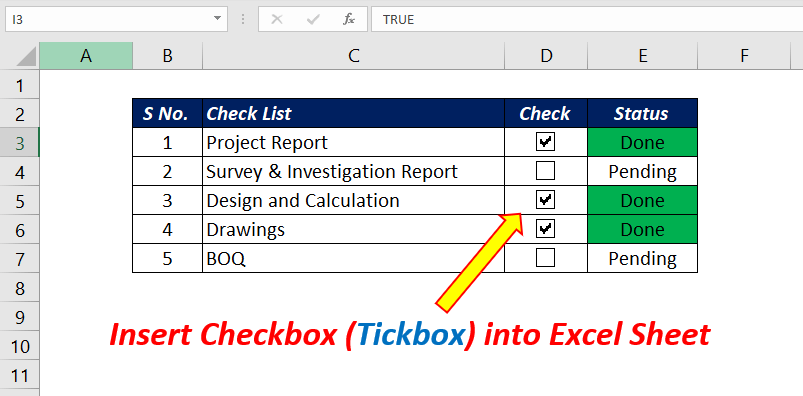 803×396 add checkbox tickbox excel sheet xl cad from xlncad.com
 How To Add Checkboxes To Excel For Interactive Checklists was posted in January 5, 2026 at 9:46 am. If you wanna have it as yours, please click the Pictures and you will go to click right mouse then Save Image As and Click Save and download the How To Add Checkboxes To Excel For Interactive Checklists Picture.. Don’t forget to share this picture with others via Facebook, Twitter, Pinterest or other social medias! we do hope you'll get inspired by ExcelKayra... Thanks again! If you have any DMCA issues on this post, please contact us!