How To Create A Sales Funnel In Excel
How To Create A Sales Funnel In Excel - There are a lot of affordable templates out there, but it can be easy to feel like a lot of the best cost a amount of money, require best special design template. Making the best template format choice is way to your template success. And if at this time you are looking for information and ideas regarding the How To Create A Sales Funnel In Excel then, you are in the perfect place. Get this How To Create A Sales Funnel In Excel for free here. We hope this post How To Create A Sales Funnel In Excel inspired you and help you what you are looking for.
Here’s an HTML representation explaining how to create a sales funnel in Excel:
Building a sales funnel allows you to visualize the customer journey, track prospects, and identify areas for improvement in your sales process. While dedicated CRM (Customer Relationship Management) software offers robust funnel management, you can effectively create and manage a basic sales funnel using Microsoft Excel. This guide walks you through the process, step-by-step.
1. Define Your Sales Stages
The first step is to clearly define the stages of your sales funnel. These stages represent the different phases a prospect goes through, from initial awareness to becoming a paying customer. Common sales funnel stages include:
- Awareness (Lead Generation): Prospects become aware of your product or service. This might involve website visits, social media engagement, or attending an event.
- Interest (Lead Qualification): Prospects express interest in your offering. They might download a whitepaper, sign up for a newsletter, or request a demo.
- Consideration (Opportunity Creation): Prospects actively consider your product or service as a solution to their problem. They might request a quote, participate in a trial, or have a sales call.
- Decision (Proposal/Negotiation): Prospects are nearing a decision. You present a proposal, negotiate terms, and address any remaining concerns.
- Action (Closed Won/Sale): The prospect makes a purchase and becomes a customer.
- Post-Purchase (Retention/Upsell): Nurturing the customer relationship for repeat business and upselling opportunities.
Tailor these stages to accurately reflect your specific sales process. You may have fewer or more stages, depending on the complexity of your business.
2. Set Up Your Excel Spreadsheet
Open a new Excel workbook and create a worksheet for your sales funnel data. Structure your columns as follows:
- Prospect Name: The name of the individual or company.
- Contact Information: Email address, phone number, etc.
- Date Entered Funnel: The date the prospect entered the funnel at the Awareness stage.
- Stage: The current stage the prospect is in (choose from your defined stages above). Use a data validation dropdown for consistency (see instructions below).
- Potential Deal Value: The estimated value of the deal if the prospect converts.
- Probability of Close: The percentage chance of closing the deal (e.g., 20%, 50%, 90%). This depends on the stage.
- Expected Revenue: Calculated field: Potential Deal Value * Probability of Close. This shows the weighted value of each opportunity.
- Close Date (Estimated): The anticipated date when the deal will close.
- Notes: Any relevant information about the prospect or the deal.
- Next Action: What needs to be done to move the prospect to the next stage.
- Action Due Date: The date the next action should be completed.
Creating a Data Validation Dropdown for the ‘Stage’ Column:
- Select the entire ‘Stage’ column (or the range of cells you want to use).
- Go to the ‘Data’ tab in the Excel ribbon.
- Click on ‘Data Validation’.
- In the ‘Settings’ tab, under ‘Allow’, choose ‘List’.
- In the ‘Source’ field, enter your sales stages, separated by commas (e.g., Awareness,Interest,Consideration,Decision,Action,Post-Purchase).
- Click ‘OK’. Now, each cell in the ‘Stage’ column will have a dropdown menu with your sales stages.
3. Populate Your Spreadsheet with Prospect Data
Start adding your prospects to the spreadsheet, filling in the information for each column. Be diligent about updating the ‘Stage’ column as prospects move through the funnel. Regularly review and update the ‘Notes’, ‘Next Action’, and ‘Action Due Date’ columns to keep track of your progress.
4. Calculate Key Metrics
Excel allows you to calculate key metrics to understand the performance of your sales funnel:
- Conversion Rate: The percentage of prospects who move from one stage to the next. For example, the conversion rate from ‘Interest’ to ‘Consideration’ is calculated as (Number of prospects in ‘Consideration’ / Number of prospects in ‘Interest’) * 100.
- Total Value per Stage: Sum the ‘Potential Deal Value’ for all prospects in each stage to see the total potential revenue represented by each stage.
- Expected Revenue per Stage: Sum the ‘Expected Revenue’ for all prospects in each stage to see the weighted potential revenue at each stage.
- Average Deal Size: The average ‘Potential Deal Value’ across all prospects.
- Sales Cycle Length: The average time it takes for a prospect to move from the ‘Date Entered Funnel’ to the ‘Close Date’.
To calculate these metrics, use Excel formulas like COUNTIF, SUMIF, and AVERAGE. For example, to calculate the number of prospects in the ‘Consideration’ stage, you would use the formula =COUNTIF(D:D,"Consideration"), assuming the ‘Stage’ column is column D.
5. Visualize Your Funnel
Create a visual representation of your sales funnel using Excel charts. A stacked bar chart or a funnel chart (if your version of Excel supports it) can be very effective.
- Create a summary table: in a new area of your spreadsheet (or a new sheet), summarize the number of prospects in each stage. For example:
| Stage | Count | |----------------|-------| | Awareness | 50 | | Interest | 30 | | Consideration | 15 | | Decision | 8 | | Action | 3 |
- Select the data in your summary table (both the ‘Stage’ and ‘Count’ columns).
- Go to the ‘Insert’ tab in the Excel ribbon.
- Choose a chart type. A ‘Bar Chart’ or ‘Funnel Chart’ (if available) is recommended.
- Customize the chart to your liking (add titles, labels, etc.).
The chart will visually represent the narrowing of the funnel as prospects move through the stages.
6. Analyze and Optimize
Regularly analyze your sales funnel data to identify bottlenecks and areas for improvement. For example, if you notice a significant drop-off between the ‘Interest’ and ‘Consideration’ stages, you might need to improve your lead nurturing process or provide more compelling content.
Use the insights gained from your funnel analysis to optimize your sales process. Experiment with different strategies and track the results in your Excel spreadsheet.
7. Automate Where Possible
While Excel isn’t a full-fledged CRM, you can automate some tasks using formulas and macros. For example, you can create a formula to automatically update the ‘Expected Revenue’ column whenever the ‘Potential Deal Value’ or ‘Probability of Close’ changes.
For more advanced automation, consider using Excel’s VBA (Visual Basic for Applications) to create custom macros. However, this requires programming knowledge.
Conclusion
Creating a sales funnel in Excel is a cost-effective way to manage your sales process and track your progress. While it may not have all the features of a dedicated CRM, it provides a solid foundation for understanding your customer journey and identifying areas for improvement. By regularly updating your data, analyzing your metrics, and optimizing your process, you can significantly improve your sales performance.
 489×259 create sales funnel chart excel from trumpexcel.com
  1550×891 sales funnel excel spreadsheet template adnia solutions from adniasolutions.com
  700×515 sales funnel template excel edraw from www.edrawsoft.com
 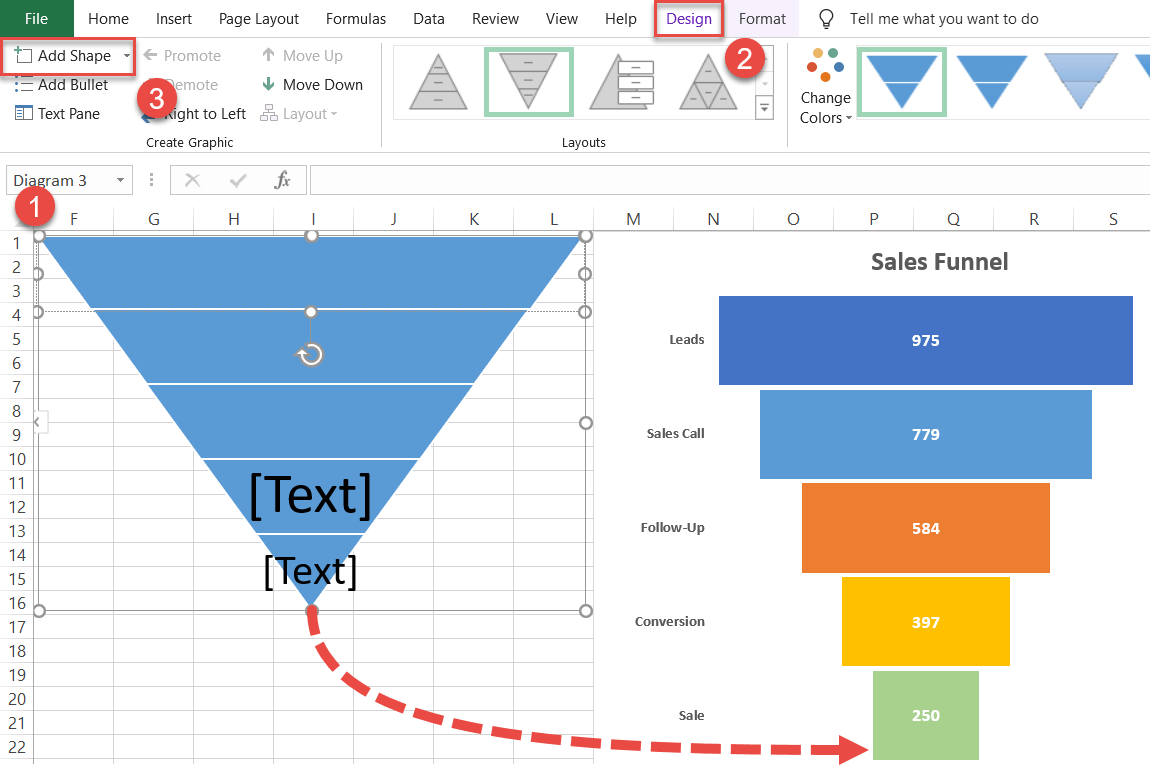 1150×766 create sales funnel chart excel automate excel from www.automateexcel.com
  1080×431 flyer template sales funnel template excel from aflyertemplate.blogspot.com
  660×684 dashboard sales funnel conversion excel from exceltable.com
  1600×1115 sales funnel templates represent sales funnel from fitsmallbusiness.com
  900×900 top sales funnel software cheap options from codeless.co
  1179×1503 sales funnel examples create template from fitsmallbusiness.com
  633×446 sales funnel chart excel chandooorg learn excel from chandoo.org
 How To Create A Sales Funnel In Excel was posted in August 1, 2025 at 6:14 am. If you wanna have it as yours, please click the Pictures and you will go to click right mouse then Save Image As and Click Save and download the How To Create A Sales Funnel In Excel Picture.. Don’t forget to share this picture with others via Facebook, Twitter, Pinterest or other social medias! we do hope you'll get inspired by ExcelKayra... Thanks again! If you have any DMCA issues on this post, please contact us!