How To Lock Formulas In Excel To Prevent Editing
How To Lock Formulas In Excel To Prevent Editing - There are a lot of affordable templates out there, but it can be easy to feel like a lot of the best cost a amount of money, require best special design template. Making the best template format choice is way to your template success. And if at this time you are looking for information and ideas regarding the How To Lock Formulas In Excel To Prevent Editing then, you are in the perfect place. Get this How To Lock Formulas In Excel To Prevent Editing for free here. We hope this post How To Lock Formulas In Excel To Prevent Editing inspired you and help you what you are looking for.
“`html
Locking Formulas in Excel to Prevent Editing
Protecting formulas in Excel is crucial for maintaining the integrity of your spreadsheets. Whether you’re sharing a financial model with colleagues, distributing a budget template, or simply ensuring your own complex calculations remain intact, preventing accidental or intentional modifications to formulas is essential. Excel offers robust features to lock formulas, allowing users to input data while safeguarding the underlying calculations. This article details how to effectively lock formulas in Excel, covering the necessary steps, nuances, and troubleshooting tips.
Understanding Excel’s Protection Features
Excel’s protection mechanism works in two phases: cell locking and sheet protection. By default, all cells in an Excel worksheet are locked, but this locking only takes effect after you enable sheet protection. This two-step process gives you precise control over which cells are editable and which are protected. To prevent formula editing, you need to unlock the cells where users are supposed to enter data, then lock the cells containing formulas, and finally, protect the worksheet.
Step-by-Step Guide to Locking Formulas
- Identify Cells with Formulas: The first step is to clearly identify the cells containing the formulas you want to protect. These are the cells you want to prevent users from directly modifying. You can use the “Go To Special” feature (accessed via the Find & Select menu on the Home tab) to select all cells containing formulas. Select the cells in the worksheet, then Home -> Find & Select -> Go To Special. Select Formulas and click OK.
- Unlock Cells for Data Input: Before locking formulas, identify the cells where users need to enter data. These cells should be unlocked. Select these cells, right-click, and choose “Format Cells.” In the Format Cells dialog box, go to the “Protection” tab. Uncheck the “Locked” box. Click “OK.” This ensures that these cells will remain editable even after sheet protection is enabled. Think of these as your input cells.
- Lock Cells Containing Formulas: Now, select the cells that contain the formulas you want to protect. Right-click on the selected cells and choose “Format Cells.” In the Format Cells dialog box, go to the “Protection” tab and make sure the “Locked” box is checked. Click “OK.” This step ensures that when sheet protection is enabled, these cells will be locked and users will not be able to edit their contents.
- Protect the Worksheet: Go to the “Review” tab on the Excel ribbon. Click on “Protect Sheet.” A “Protect Sheet” dialog box will appear.
- Password Protection (Optional): If you want to prevent users from unprotecting the sheet, enter a password in the “Password to unprotect sheet” box. Important: If you lose this password, you will not be able to unprotect the sheet. Excel does not offer any password recovery options for sheet protection. If you don’t need to prevent someone from unprotecting the sheet, leave this box blank.
- Allow Users To: In the “Allow users of this worksheet to” list, select the actions you want users to be able to perform. Commonly selected options include “Select locked cells” and “Select unlocked cells.” You might also choose to allow actions like “Format Cells,” “Format Columns,” “Insert Rows,” or “Delete Columns” depending on the level of access you want to grant. Be mindful of the permissions you grant; allowing formatting changes, for instance, won’t circumvent formula protection but might alter the spreadsheet’s appearance.
- Click “OK.” If you entered a password, you’ll be prompted to re-enter it to confirm.
- Test the Protection: Try to edit a cell containing a locked formula. Excel should display a message indicating that the cell is protected and cannot be modified. Verify that you can still edit the unlocked cells where data input is expected.
Advanced Considerations and Tips
- Hidden Formulas: In addition to locking cells, you can also hide formulas from the formula bar. In the “Format Cells” dialog box, on the “Protection” tab, check the “Hidden” box before protecting the sheet. This will prevent users from seeing the formulas even if they select the cell. This is useful for obscuring proprietary calculations. Note that it only works in conjunction with sheet protection.
- Protecting the Workbook Structure: To prevent users from adding, deleting, moving, hiding, or renaming worksheets, protect the workbook structure. Go to the “Review” tab and click “Protect Workbook.” This offers password protection for the workbook’s structure, preventing modifications to the arrangement of worksheets.
- Macro-Enabled Workbooks: If your Excel file contains macros, ensure that you digitally sign your VBA code to prevent users from altering the macros. This requires obtaining a digital certificate.
- Conditional Formatting and Data Validation: Locking formulas does not affect conditional formatting or data validation rules. These features can still be used to control data input and highlight specific cell values. Consider using these features in conjunction with formula protection to create a more robust and user-friendly spreadsheet.
- Avoid Over-Protection: While protecting formulas is important, avoid over-protecting your spreadsheet. Only lock the formulas and critical settings that need protection. Making it too difficult for users to work with the spreadsheet can lead to frustration and inefficiency. Balance security with usability.
- Document Your Spreadsheet: Clear documentation explaining the purpose of formulas and the limitations of the protected sheet is invaluable. Provide instructions on how to use the spreadsheet and where to enter data. Well-documented spreadsheets are easier to maintain and use, even with protection in place.
- Testing: Always thoroughly test your protection setup before distributing the spreadsheet. Ensure that the intended users can input data in the designated cells and cannot modify the protected formulas. Test with various scenarios and different user levels to identify any potential issues.
- Version Control: Always maintain a backup copy of your unprotected spreadsheet. This allows you to easily make changes to the formulas or protection settings if needed. Use version control systems or simple file naming conventions to track different versions of your spreadsheet.
Troubleshooting Common Issues
- Cannot Edit Unlocked Cells: If you are unable to edit cells that you have unlocked, ensure that sheet protection is not preventing you from selecting unlocked cells. Check the “Allow users of this worksheet to” list in the “Protect Sheet” dialog box to ensure “Select unlocked cells” is checked.
- Forgot Password: If you forget the password for sheet protection, there is no built-in way to recover it. You will need to use third-party password recovery tools, which may not always be successful. Prevention is the best approach – consider not using a password if strict security is not required.
- Unexpected Behavior After Protection: If you encounter unexpected behavior after protecting the sheet, carefully review the permissions you granted in the “Protect Sheet” dialog box. Consider unprotecting the sheet and re-protecting it with different permissions.
Conclusion
Locking formulas in Excel is a straightforward process that significantly enhances the security and integrity of your spreadsheets. By carefully identifying cells with formulas, unlocking input cells, and enabling sheet protection, you can prevent unintended modifications and maintain the accuracy of your calculations. Remember to test your protection settings thoroughly and document your spreadsheet clearly to ensure a smooth user experience. Using a combination of locking, hiding formulas, and protecting workbook structure provides a multi-layered approach to safeguarding your Excel data. “`
 768×480 hide excel formulas lock cells avoid editing from howtoexcelatexcel.com
 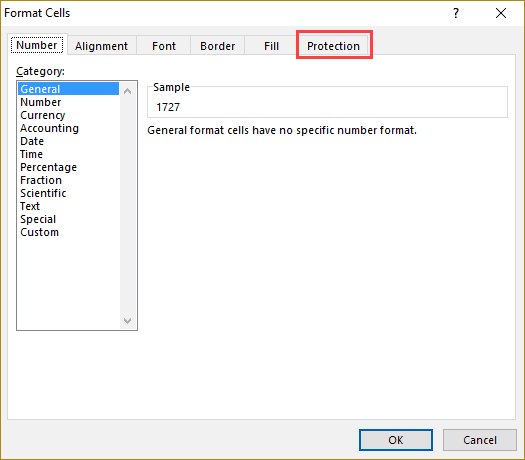 474×415 lock formulas excel step step guide from trumpexcel.com
  768×452 lock excel cells formulas prevent editing from 14um.net
  474×509 steps lock formulas excel step step guide from yodalearning.com
 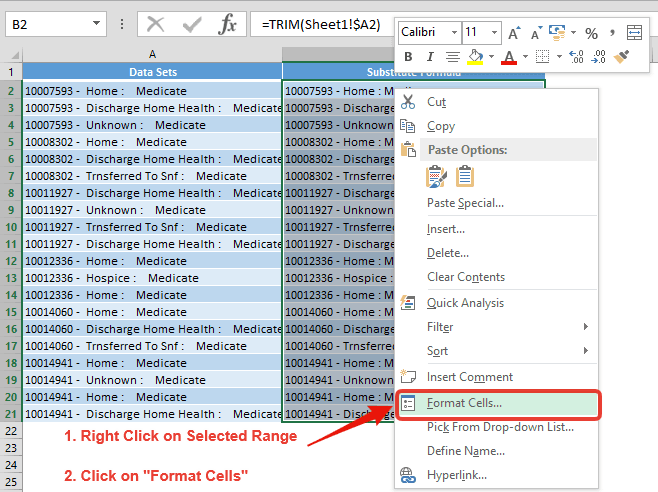 658×492 lock cells avoid editing complete guide excel tips from excelsirji.com
  525×473 lock protect formulas excel from www.extendoffice.com
  1024×620 prevent editing excel cells formulas from www.free-power-point-templates.com
  640×360 lock cells editing protect formulas excel campus from www.excelcampus.com
 How To Lock Formulas In Excel To Prevent Editing was posted in December 11, 2025 at 6:54 pm. If you wanna have it as yours, please click the Pictures and you will go to click right mouse then Save Image As and Click Save and download the How To Lock Formulas In Excel To Prevent Editing Picture.. Don’t forget to share this picture with others via Facebook, Twitter, Pinterest or other social medias! we do hope you'll get inspired by ExcelKayra... Thanks again! If you have any DMCA issues on this post, please contact us!