How To Protect Excel Sheet With Password Without VBA
How To Protect Excel Sheet With Password Without VBA - There are a lot of affordable templates out there, but it can be easy to feel like a lot of the best cost a amount of money, require best special design template. Making the best template format choice is way to your template success. And if at this time you are looking for information and ideas regarding the How To Protect Excel Sheet With Password Without VBA then, you are in the perfect place. Get this How To Protect Excel Sheet With Password Without VBA for free here. We hope this post How To Protect Excel Sheet With Password Without VBA inspired you and help you what you are looking for.
“`html
Protecting Your Excel Sheet with a Password (No VBA Required)
Microsoft Excel is a powerful tool for data management, analysis, and reporting. However, its versatility also means that sensitive data stored within spreadsheets needs protection. While VBA (Visual Basic for Applications) offers extensive customization options, it’s not always necessary, or even desirable, to use it for basic protection. Excel provides built-in features to password-protect your sheets and workbooks without resorting to code.
Understanding the Levels of Protection
Before diving into the “how-to,” it’s crucial to understand the different levels of protection Excel offers:
- Protecting a Sheet: This restricts users from modifying the sheet’s content, structure (like inserting/deleting rows or columns), or formatting. You can specify what actions are permitted even when the sheet is protected.
- Protecting a Workbook Structure: This prevents users from adding, deleting, renaming, moving, or hiding sheets within the workbook. It protects the overall organization of your workbook.
- Encrypting a Workbook: This requires a password to even open the Excel file. This is the strongest form of protection, as it prevents unauthorized access to the data altogether.
This guide focuses on protecting individual sheets and encrypting the workbook, both without using VBA.
Protecting an Excel Sheet (Without VBA)
Here’s how to protect a single Excel sheet to prevent unauthorized modifications:
- Open the Excel Workbook: Launch Microsoft Excel and open the workbook containing the sheet you want to protect.
- Select the Sheet: Click on the sheet tab at the bottom of the Excel window to select the sheet you wish to protect.
- Access the “Protect Sheet” Option: There are several ways to access the “Protect Sheet” dialog box:
- Method 1 (Review Tab): Go to the “Review” tab on the Excel ribbon. In the “Protect” group, click on the “Protect Sheet” button.
- Method 2 (Right-Click): Right-click on the sheet tab at the bottom of the Excel window. In the context menu that appears, select “Protect Sheet…”
- The “Protect Sheet” Dialog Box: The “Protect Sheet” dialog box will appear. This is where you configure the protection settings.
- Enter a Password: In the “Password to unprotect sheet” field, enter the password you want to use to protect the sheet. Important: Choose a strong and memorable password. If you lose or forget the password, you will likely not be able to unprotect the sheet and modify its contents. Consider using a password manager to store your passwords securely.
- Choose Allowed Actions: Below the password field, you’ll see a list of options under “Allow all users of this worksheet to.” These options define what actions users *will* be able to perform even when the sheet is protected. Common options include:
- Select Locked Cells: Allows users to select cells that are locked (the default behavior for cells in a protected sheet).
- Select Unlocked Cells: Allows users to select cells that are unlocked.
- Format Cells: Allows users to change the formatting of cells (e.g., font, color, alignment).
- Format Columns: Allows users to change the formatting of columns (e.g., width, hidden).
- Format Rows: Allows users to change the formatting of rows (e.g., height, hidden).
- Insert Columns: Allows users to insert new columns.
- Insert Rows: Allows users to insert new rows.
- Insert Hyperlinks: Allows users to insert hyperlinks.
- Delete Columns: Allows users to delete columns.
- Delete Rows: Allows users to delete rows.
- Sort: Allows users to sort the data in the sheet.
- Use AutoFilter: Allows users to use the AutoFilter feature to filter data.
- Use PivotTable Reports: Allows users to use PivotTable reports.
- Edit Objects: Allows users to edit objects like charts and images.
- Edit Scenarios: Allows users to edit scenarios.
Carefully select the options that are appropriate for your needs. For example, if you want users to be able to filter the data but not modify it, check “Select Locked Cells,” “Select Unlocked Cells,” and “Use AutoFilter.” By default, all cells are locked, so you need to unlock cells that you want users to be able to edit before protecting the sheet.
- Confirm the Password: After selecting the allowed actions, click “OK.” Excel will prompt you to re-enter the password to confirm it. Make sure you enter it exactly as you did the first time.
- Click “OK” Again: Click “OK” in the confirmation dialog box. The sheet is now protected.
Unlocking Cells for Editing (Before Protecting the Sheet)
Before protecting a sheet, you usually need to unlock specific cells or ranges that you want users to be able to edit. Here’s how:
- Select the Cells: Select the cells or range of cells that you want to unlock.
- Access the “Format Cells” Dialog Box: There are several ways to access the “Format Cells” dialog box:
- Method 1 (Right-Click): Right-click on the selected cells and choose “Format Cells…” from the context menu.
- Method 2 (Home Tab): Go to the “Home” tab on the Excel ribbon. In the “Cells” group, click the “Format” dropdown arrow and choose “Format Cells…”
- Method 3 (Keyboard Shortcut): Press Ctrl+1 (or Cmd+1 on a Mac).
- Go to the “Protection” Tab: In the “Format Cells” dialog box, go to the “Protection” tab.
- Uncheck “Locked”: Uncheck the “Locked” checkbox. By default, all cells are “Locked.” Unchecking this box allows users to edit these cells when the sheet is protected.
- Click “OK”: Click “OK” to apply the changes.
Now, when you protect the sheet (following the steps above), only the unlocked cells will be editable. All other cells will remain locked and protected.
Protecting the Workbook Structure (Without VBA)
To prevent users from adding, deleting, renaming, moving, or hiding sheets, protect the workbook structure:
- Open the Excel Workbook: Launch Microsoft Excel and open the workbook you want to protect.
- Access the “Protect Workbook” Option:
- Review Tab: Go to the “Review” tab on the Excel ribbon. In the “Protect” group, click on the “Protect Workbook” button.
- The “Protect Structure and Windows” Dialog Box: The “Protect Structure and Windows” dialog box will appear.
- Enter a Password (Optional): You can optionally enter a password in the “Password” field. If you enter a password, users will need to enter it to unprotect the workbook structure. If you leave the password field blank, the structure will be protected, but anyone can unprotect it (effectively removing the protection). **Using a password is highly recommended for meaningful protection.**
- Check “Structure”: Make sure the “Structure” checkbox is checked. This is what protects the sheet organization. The “Windows” checkbox refers to protecting the size and position of the Excel window; it’s less commonly used.
- Click “OK”: Click “OK.”
- Confirm the Password (If Applicable): If you entered a password, Excel will prompt you to re-enter it to confirm.
- Click “OK” Again: Click “OK” in the confirmation dialog box. The workbook structure is now protected.
Encrypting the Excel Workbook (Without VBA)
Encrypting the workbook requires a password to even *open* the file. This offers the highest level of security. This is different from protecting the sheet or the structure; this prevents the file from being opened at all by unauthorized individuals.
- Open the Excel Workbook: Launch Microsoft Excel and open the workbook you want to encrypt.
- Go to the “Info” Tab: Click on the “File” tab in the upper-left corner of the Excel window. This takes you to the “Backstage view.” Select “Info” from the left-hand menu.
- Click “Protect Workbook”: Under the “Protect Workbook” section, click the “Protect Workbook” button (it may say “Protect Workbook and Share”).
- Choose “Encrypt with Password”: From the dropdown menu, select “Encrypt with Password.”
- Enter a Password: The “Encrypt Document” dialog box will appear. Enter the password you want to use to encrypt the workbook. Again, choose a strong and memorable password. If you lose this password, you will be unable to open the file.
- Click “OK”: Click “OK.”
- Confirm the Password: Excel will prompt you to re-enter the password to confirm it.
- Click “OK” Again: Click “OK” in the confirmation dialog box. The workbook is now encrypted.
- Save the Workbook: Crucially, you must save the workbook after encrypting it. If you don’t save the file, the encryption will not be applied.
Important Considerations and Caveats
- Password Strength: Choose strong passwords that are difficult to guess. Use a combination of upper- and lowercase letters, numbers, and symbols.
- Password Recovery: Excel does not provide a built-in password recovery mechanism for sheet protection, workbook structure protection, or encryption. If you lose the password, you will likely not be able to access or modify the protected data. Back up your passwords securely!
- Security Limitations: While these methods provide a good level of protection, they are not foolproof. Determined individuals with specialized tools may be able to bypass the protection. However, for most everyday scenarios, these features provide sufficient security.
- File Format: Modern Excel file formats (.xlsx, .xlsm) offer stronger encryption than older formats (.xls). When encrypting, save your workbook in a modern format for optimal security.
- User Education: Ensure that users who have access to the protected spreadsheets understand the importance of security and do not share passwords with unauthorized individuals.
By following these steps, you can effectively protect your Excel sheets and workbooks with passwords, safeguarding your sensitive data without resorting to VBA coding. Remember to choose strong passwords and store them securely. Always back up your important files, including passwords, to prevent data loss.
“`
 1920×1080 password protect spreadsheet password protect spreadsheet lovely vba from db-excel.com
  914×287 vba protect sheet protect sheet excel vba from www.educba.com
  1059×545 excel vba sheet unprotect password worksheet resume examples from www.thesecularparent.com
 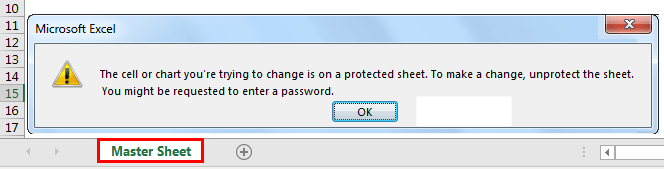 664×169 vba protect sheet password protect excel sheet vba from www.wallstreetmojo.com
  1600×658 protect unprotect worksheets excel vba from developerpublish.com
  1024×576 protect excel sheet password from www.easyclickacademy.com
  573×414 unprotect excel vba project password excelsupersite from www.excelsupersite.com
  601×341 vba unprotect sheet unprotect sheet excel vba from www.educba.com
 How To Protect Excel Sheet With Password Without VBA was posted in July 24, 2025 at 8:52 pm. If you wanna have it as yours, please click the Pictures and you will go to click right mouse then Save Image As and Click Save and download the How To Protect Excel Sheet With Password Without VBA Picture.. Don’t forget to share this picture with others via Facebook, Twitter, Pinterest or other social medias! we do hope you'll get inspired by ExcelKayra... Thanks again! If you have any DMCA issues on this post, please contact us!