How To Use Power Query In Excel To Clean Data
How To Use Power Query In Excel To Clean Data - There are a lot of affordable templates out there, but it can be easy to feel like a lot of the best cost a amount of money, require best special design template. Making the best template format choice is way to your template success. And if at this time you are looking for information and ideas regarding the How To Use Power Query In Excel To Clean Data then, you are in the perfect place. Get this How To Use Power Query In Excel To Clean Data for free here. We hope this post How To Use Power Query In Excel To Clean Data inspired you and help you what you are looking for.
Cleaning Data with Power Query in Excel: A Comprehensive Guide
Data cleaning is a crucial step in any data analysis process. Raw data often contains inconsistencies, errors, and missing values that can significantly impact the accuracy and reliability of your results. Power Query, a powerful data transformation and data preparation engine built into Excel, offers a user-friendly and efficient way to clean and reshape your data without writing complex formulas or macros.
What is Power Query?
Power Query, also known as “Get & Transform Data,” is a data connectivity technology that enables you to discover, connect to, combine, and refine data from a variety of sources. It provides a graphical interface that allows you to perform a wide range of data cleaning and transformation operations, from simple tasks like removing spaces to more complex operations like merging tables and pivoting data.
Accessing Power Query
In Excel, you can access Power Query through the “Data” tab on the ribbon. Look for the “Get & Transform Data” group. The options within this group provide various ways to import data and launch the Power Query Editor.
The Power Query Editor
The Power Query Editor is a separate window where you perform all your data cleaning and transformation steps. It features a ribbon with various commands organized into groups, a query pane on the left that lists all your queries, a data preview area in the center that displays your data, and a “Query Settings” pane on the right that allows you to track and manage your applied steps.
Key Data Cleaning Operations with Power Query
Here are some of the most common and useful data cleaning operations you can perform using Power Query:
1. Importing Data
Power Query supports a wide range of data sources, including Excel workbooks, CSV files, databases (SQL Server, Access, etc.), web pages, and more. To import data, go to the “Data” tab, select “Get Data,” and choose the appropriate data source. Follow the prompts to connect to your data and select the table or sheet you want to import.
2. Removing Duplicate Rows
Duplicate rows can skew your analysis. To remove them, select the table, go to the “Home” tab in the Power Query Editor, click “Remove Rows,” and choose “Remove Duplicates.” Power Query will automatically identify and remove any rows where all columns have the same values.
3. Removing Blank Rows
Blank rows can also interfere with your analysis. To remove them, filter your table by selecting the column containing the blanks, clicking the filter icon, unchecking the “(Select All)” option, and then checking “(Blank).” Click “OK” to filter the table, then go to the “Home” tab, click “Remove Rows,” and choose “Remove Top Rows” and enter `0`. Then click “Remove Bottom Rows” and enter `0`. Alternatively, use “Remove Errors” if the blank rows are the only error in the column.
4. Filling Empty Cells (Missing Values)
Missing values can be handled in several ways. You can fill them with a specific value (e.g., 0, “Unknown”), the value from the row above or below, or a value calculated from other data. To fill empty cells, select the column with missing values, go to the “Transform” tab, click “Fill,” and choose either “Down” (to fill with the value above) or “Up” (to fill with the value below). To replace with a specific value, select “Replace Values” and replace `null` with the desired value.
5. Replacing Values
Replacing values is useful for correcting errors, standardizing text, or converting data types. To replace values, select the column, go to the “Transform” tab, click “Replace Values,” enter the value you want to replace and the value you want to replace it with. For example, you could replace all instances of “NY” with “New York.”
6. Changing Data Types
Ensuring that your data has the correct data type is crucial for accurate analysis. Power Query automatically detects data types, but sometimes you need to manually change them. To change a data type, select the column, click the icon to the left of the column header, and choose the appropriate data type (e.g., Text, Number, Date, Currency). Incorrect data types can lead to errors in calculations and filtering.
7. Trimming Whitespace
Leading and trailing spaces can cause issues when comparing or filtering data. To remove them, select the column, go to the “Transform” tab, click “Format,” and choose “Trim.” This will remove any spaces before or after the text in each cell.
8. Cleaning Text: Uppercase, Lowercase, and Capitalize
To standardize text case, you can convert text to uppercase, lowercase, or capitalize the first letter of each word. Select the column, go to the “Transform” tab, click “Format,” and choose “Uppercase,” “Lowercase,” or “Capitalize Each Word.”
9. Splitting Columns
Sometimes, you need to split a single column into multiple columns based on a delimiter (e.g., a comma, space, or other character). Select the column, go to the “Transform” tab, click “Split Column,” and choose “By Delimiter.” Specify the delimiter and whether you want to split at the leftmost delimiter, rightmost delimiter, or each occurrence of the delimiter.
10. Merging Columns
Conversely, you can merge multiple columns into a single column. Select the columns you want to merge, go to the “Transform” tab, click “Merge Columns,” specify the separator you want to use (e.g., a comma, space), and give the new column a name.
11. Filtering Data
Filtering allows you to select only the rows that meet certain criteria. Click the filter icon in the column header, and use the available filter options to specify your criteria. You can filter by value, date range, number range, or text criteria.
12. Grouping Data
Grouping allows you to summarize data by grouping rows based on one or more columns. Select the columns you want to group by, go to the “Transform” tab, click “Group By,” and specify the aggregation you want to perform (e.g., Sum, Average, Count) for each group.
Applying and Loading the Data
Once you’ve finished cleaning and transforming your data, click “Close & Load” on the “Home” tab to load the cleaned data back into Excel as a table. You can choose to load the data to a new worksheet or an existing worksheet. The “Close & Load To…” option provides more control over how the data is loaded (e.g., as a table, a connection only).
Refreshing the Data
One of the most powerful features of Power Query is its ability to automatically refresh the data. If the source data changes, you can simply click “Refresh All” on the “Data” tab to update the data in your Excel table with the latest changes. This saves you time and effort by automating the data cleaning process.
The M Language
While Power Query provides a graphical interface, it also uses a functional programming language called “M” behind the scenes. Each step you perform in the Power Query Editor is translated into an M expression. While you don’t necessarily need to learn M to use Power Query effectively, understanding the basics can give you more control over your data transformations and allow you to perform more complex operations.
Conclusion
Power Query is an invaluable tool for anyone who works with data in Excel. Its intuitive interface and wide range of data cleaning and transformation capabilities make it easy to prepare your data for analysis, saving you time and improving the accuracy of your results. By mastering Power Query, you can unlock the full potential of your data and gain valuable insights.
 616×321 power query excel power query excel examples from www.educba.com
 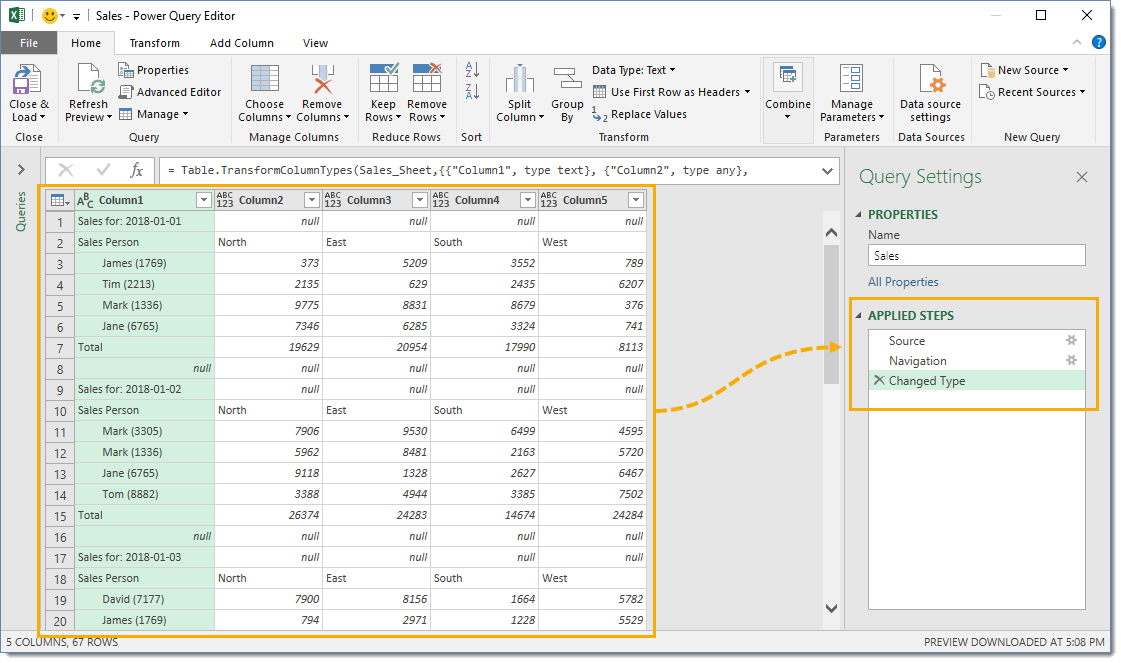 1121×663 importing cleaning data power query peltier tech from peltiertech.com
  344×486 master excel power query step step tutorial simplilearn from www.simplilearn.com
 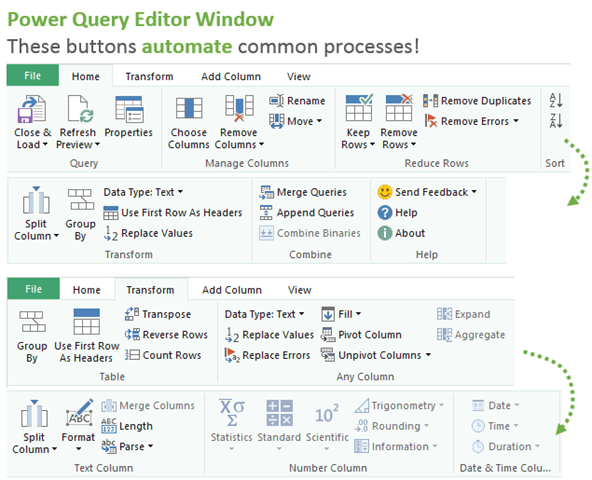 592×480 power query overview introduction excels powerful data from www.excelcampus.com
 How To Use Power Query In Excel To Clean Data was posted in September 30, 2025 at 5:02 am. If you wanna have it as yours, please click the Pictures and you will go to click right mouse then Save Image As and Click Save and download the How To Use Power Query In Excel To Clean Data Picture.. Don’t forget to share this picture with others via Facebook, Twitter, Pinterest or other social medias! we do hope you'll get inspired by ExcelKayra... Thanks again! If you have any DMCA issues on this post, please contact us!