Simple Project Management Template Excel With Gantt Chart
Simple Project Management Template Excel With Gantt Chart - There are a lot of affordable templates out there, but it can be easy to feel like a lot of the best cost a amount of money, require best special design template. Making the best template format choice is way to your template success. And if at this time you are looking for information and ideas regarding the Simple Project Management Template Excel With Gantt Chart then, you are in the perfect place. Get this Simple Project Management Template Excel With Gantt Chart for free here. We hope this post Simple Project Management Template Excel With Gantt Chart inspired you and help you what you are looking for.
Simple Project Management Template with Gantt Chart in Excel
Excel is a versatile tool that can be surprisingly effective for managing small to medium-sized projects. Creating a simple project management template with a Gantt chart directly in Excel offers a readily accessible, easily customizable, and cost-effective solution for planning and tracking tasks. This document will guide you through building such a template.
Why Use Excel for Project Management?
While dedicated project management software offers more advanced features, Excel provides several advantages, particularly for smaller projects or teams with limited resources:
- Familiarity: Most people are already familiar with Excel, reducing the learning curve.
- Accessibility: Excel is widely available, often already installed on computers.
- Cost-Effectiveness: No additional software costs are incurred.
- Customization: Excel offers great flexibility in tailoring the template to specific needs.
- Ease of Use: Simple tasks like adding, deleting, and editing entries are straightforward.
Building the Project Management Template
Here’s a step-by-step guide to creating your project management template in Excel:
1. Setting Up the Worksheet
Start by opening a new Excel workbook and renaming the first sheet to “Project Plan” or something similar. This sheet will house your main project data.
2. Defining Columns
Create the following columns in the first row of your spreadsheet. These represent the key elements of your project:
- Task ID: A unique identifier for each task (e.g., 1, 2, 3…).
- Task Name: A brief description of the task.
- Assigned To: The person responsible for completing the task.
- Start Date: The planned start date of the task.
- End Date: The planned end date of the task.
- Duration (Days): The calculated duration of the task in days.
- Dependencies: The Task ID(s) of any task(s) that must be completed before this task can begin.
- Status: The current status of the task (e.g., Not Started, In Progress, Completed, On Hold).
- % Complete: The percentage of the task that has been completed.
Adjust column widths as needed for readability.
3. Entering Sample Data
Populate the spreadsheet with a few sample tasks to test your formulas and the Gantt chart. This will also give you a visual representation of how the template will look.
4. Calculating Duration
The “Duration (Days)” column can be calculated automatically using a simple formula. In the cell under the “Duration (Days)” column (e.g., cell F2), enter the following formula:
=IF(ISBLANK(D2),"",IF(ISBLANK(E2),"",E2-D2+1))
This formula checks if either the Start Date or End Date is blank. If either is blank, it leaves the Duration cell blank. Otherwise, it calculates the difference between the End Date and Start Date, adding 1 to include both the start and end dates. Drag this formula down to apply it to all rows.
5. Creating a Status Dropdown
To ensure consistent status updates, create a dropdown list for the “Status” column. Select the cells under the “Status” column (e.g., G2:G100). Go to the “Data” tab, click on “Data Validation,” and choose “List” from the “Allow” dropdown. In the “Source” box, enter your desired status options, separated by commas (e.g., Not Started,In Progress,Completed,On Hold). Click “OK.” Now, each cell in the “Status” column will have a dropdown menu with your status options.
6. Adding Conditional Formatting for Status
Use conditional formatting to visually highlight the status of each task. Select the cells in the “Status” column. Go to the “Home” tab, click on “Conditional Formatting,” then “New Rule.” Choose “Format only cells that contain.” In the first dropdown, select “Cell Value,” in the second, select “equal to,” and in the third, type “Completed”. Click “Format” and choose a green fill color. Repeat this process for other statuses (e.g., “In Progress” with yellow, “On Hold” with red). This will make it easy to quickly see the status of each task.
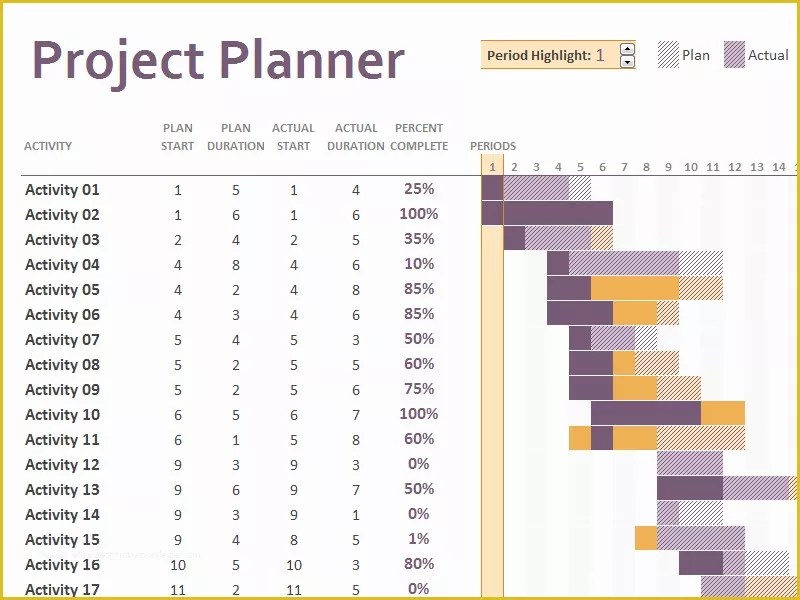
7. Creating the Gantt Chart
This is where things get a bit more involved, but it’s crucial for visualizing your project timeline.
- Create a Date Row: Above your project data (e.g., row 1), create a row of consecutive dates representing the project timeline. Start with the earliest start date of your project. You can use the fill handle (the small square at the bottom right of a cell) to drag the date across to create a series of dates. You’ll likely need to scroll quite a bit to cover the entire project duration. Format the dates in a concise format (e.g., “d-mmm”).
- Conditional Formatting for Task Bars: Select the range of cells where you want your Gantt chart to appear (e.g., starting from the cell directly below the first date in your date row, and extending down to cover all your tasks and across to cover the entire date range). Go to the “Home” tab, click on “Conditional Formatting,” then “New Rule.” Choose “Use a formula to determine which cells to format.”
- Enter the Formula: Enter the following formula in the formula box (replace “D2” with the cell containing the first task’s Start Date and “E2” with the cell containing the first task’s End Date; replace “B$2” with the cell containing the first date in your date row):
=AND(B$2>=D2,B$2<=E2)This formula checks if the date in the date row (B$2) is greater than or equal to the task's start date (D2) AND less than or equal to the task's end date (E2). The dollar signs ($) ensure that the row number for the date row remains fixed when the formatting is applied to other cells.
- Choose a Format: Click "Format" and choose a fill color for your task bars. This will be the color of your bars in the Gantt chart. Click "OK" twice.
- Adjust the Chart: You may need to adjust the row height to make the Gantt chart visually appealing. Select all rows containing the Gantt chart area and adjust the row height to a suitable value.
8. Enhance the Gantt Chart (Optional)
You can further enhance the Gantt chart with features like:
- Progress Indication: Use a different fill color or a border to indicate the percentage of completion. This involves adding another conditional formatting rule based on the "% Complete" column.
- Highlighting Today's Date: Add conditional formatting to highlight the current date in the date row. This will provide a quick visual reference point.
- Weekend Highlighting: Highlight weekends in the Gantt chart to make it easier to identify working days.
Using the Template
Once your template is set up, using it is straightforward:
- Add New Tasks: Add new rows for each task, filling in the relevant information. The "Duration" column will automatically calculate the duration.
- Update Status: Regularly update the "Status" and "% Complete" columns to track progress. The conditional formatting will automatically update the visual representation.
- Monitor Dependencies: Pay attention to the "Dependencies" column to ensure tasks are completed in the correct order.
- Adjust Dates: If tasks are delayed or completed early, adjust the "Start Date" and "End Date" columns. The Gantt chart will automatically update.
Limitations of Excel-Based Project Management
While Excel is a useful tool, it has limitations:
- Collaboration: Sharing and collaborating on the same Excel file can be challenging, especially for larger teams.
- Scalability: Excel is not ideal for managing very large or complex projects with numerous tasks and dependencies.
- Reporting: Creating detailed reports and dashboards can be time-consuming.
- Advanced Features: Excel lacks advanced features such as resource management, critical path analysis, and risk management.
Conclusion
Creating a simple project management template with a Gantt chart in Excel is a practical solution for managing smaller projects efficiently. It leverages a familiar tool, requires minimal investment, and offers a customizable approach. While it's not a replacement for dedicated project management software for large or complex projects, it provides a valuable and accessible method for planning, tracking, and visualizing project progress.
 800×600 project management excel gantt chart template from www.heritagechristiancollege.com
  1634×986 project management excel gantt chart template excel templates from www.exceltemplate123.us
  1858×2750 project management excel gantt chart template template from www.contrapositionmagazine.com
 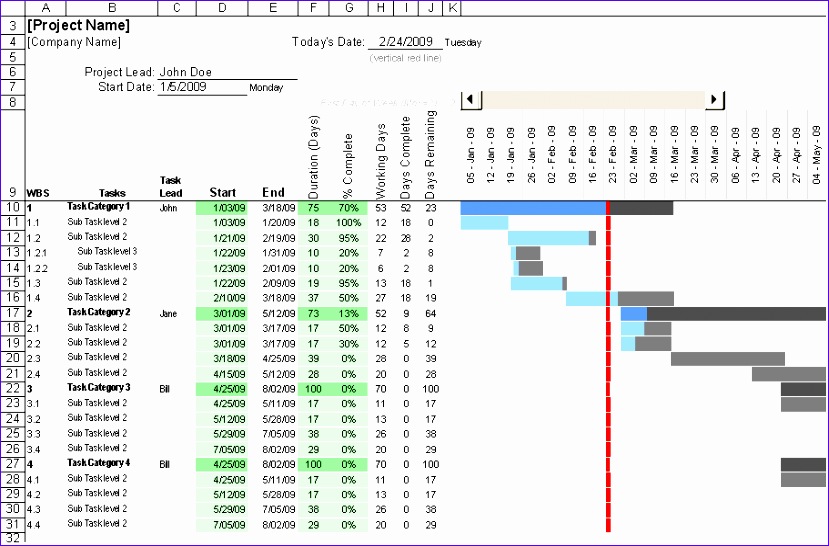 829×546 project management excel gantt chart template excel templates from www.exceltemplate123.us
 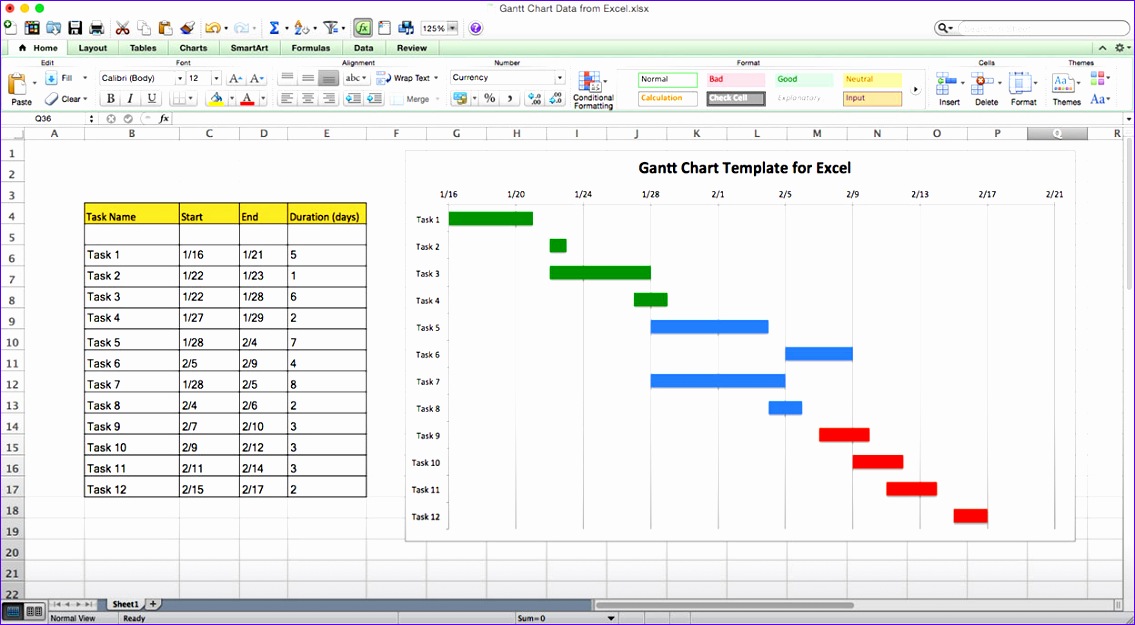 1135×625 excel simple gantt chart template excel templates from www.exceltemplate123.us
 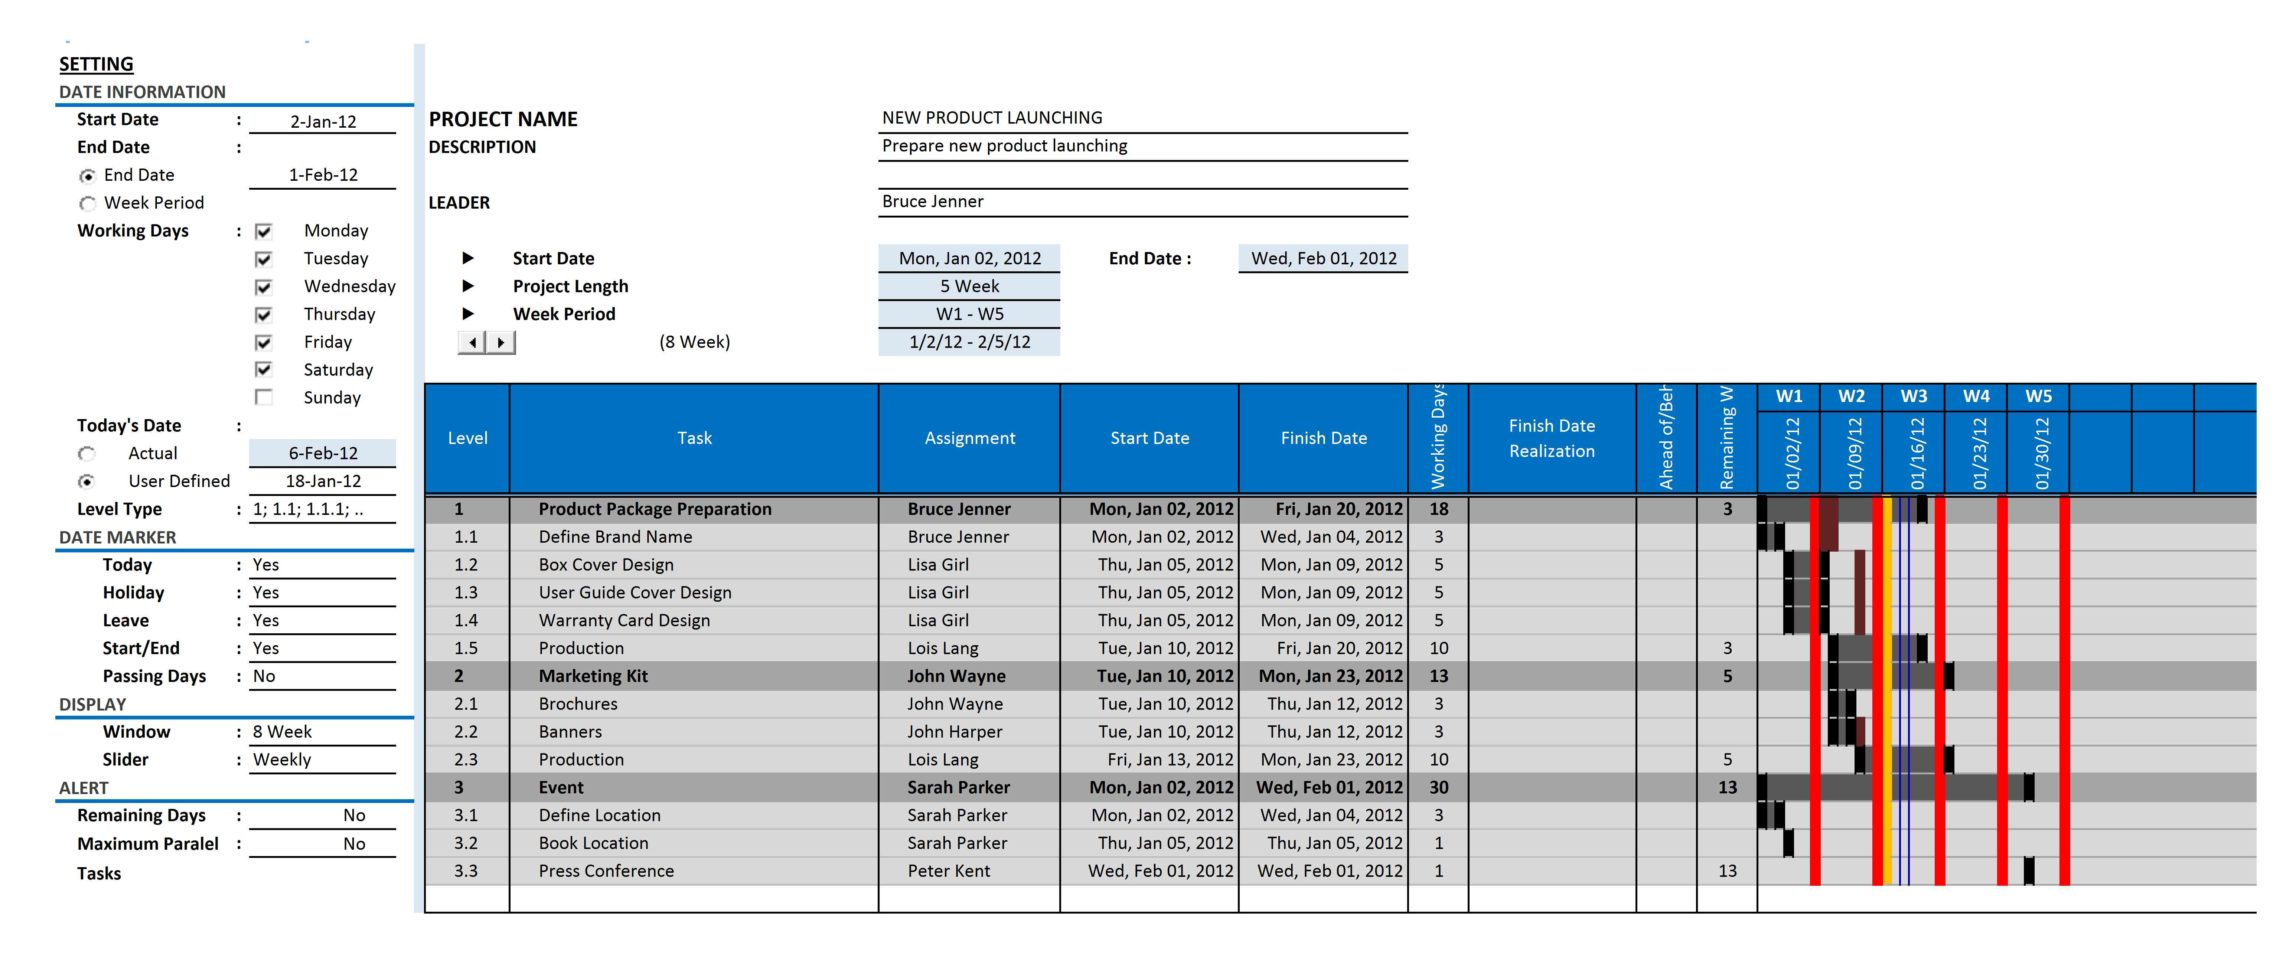 2296×970 excel spreadsheet gantt chart template spreadsheet templates from db-excel.com
  2560×1779 gantt chart templates excel templatearchive from templatearchive.com
  1588×814 excel gantt chart template easy project management project etsy from www.etsy.com
 Simple Project Management Template Excel With Gantt Chart was posted in September 19, 2025 at 4:50 am. If you wanna have it as yours, please click the Pictures and you will go to click right mouse then Save Image As and Click Save and download the Simple Project Management Template Excel With Gantt Chart Picture.. Don’t forget to share this picture with others via Facebook, Twitter, Pinterest or other social medias! we do hope you'll get inspired by ExcelKayra... Thanks again! If you have any DMCA issues on this post, please contact us!