How To Use Data Validation To Prevent Duplicates In Excel
How To Use Data Validation To Prevent Duplicates In Excel - There are a lot of affordable templates out there, but it can be easy to feel like a lot of the best cost a amount of money, require best special design template. Making the best template format choice is way to your template success. And if at this time you are looking for information and ideas regarding the How To Use Data Validation To Prevent Duplicates In Excel then, you are in the perfect place. Get this How To Use Data Validation To Prevent Duplicates In Excel for free here. We hope this post How To Use Data Validation To Prevent Duplicates In Excel inspired you and help you what you are looking for.
“`html
Preventing Duplicates in Excel with Data Validation
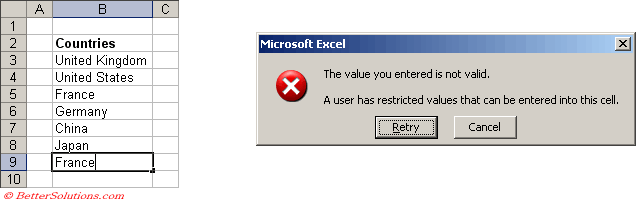
Data validation is a powerful Excel feature that allows you to control the type of data entered into a cell or range of cells. This is crucial for maintaining data integrity, ensuring accuracy, and simplifying data analysis. One of the most common and effective uses of data validation is preventing the entry of duplicate values within a dataset.
Why Prevent Duplicates?
Duplicate data can wreak havoc on spreadsheets. It can lead to:
- Inaccurate Reports: Counts and sums can be inflated, leading to misleading conclusions.
- Inefficient Analysis: Sorting, filtering, and querying data becomes more complex and time-consuming.
- Wasted Resources: Duplicate entries consume unnecessary storage space and can increase processing time.
- Erroneous Decisions: Decisions based on flawed data can have serious consequences.
Preventing duplicates from being entered in the first place is far more efficient than trying to identify and remove them later.
Steps to Prevent Duplicates Using Data Validation
Here’s a comprehensive guide to using data validation to prevent duplicate entries in Excel:
- Select the Target Range:
Begin by selecting the cells where you want to prevent duplicates. This could be a single column (e.g., a list of email addresses), a row, or a rectangular range of cells. Ensure you select *all* the cells where you want the validation rule to apply before proceeding.
- Access Data Validation:
Navigate to the “Data” tab on the Excel ribbon. In the “Data Tools” group, click on the “Data Validation” button. This will open the Data Validation dialog box.
- Choose “Custom” Validation:
In the Data Validation dialog box, go to the “Settings” tab. From the “Allow” dropdown menu, select “Custom”. This allows you to define your own validation rule using a formula.
- Enter the Formula:
In the “Formula” box, enter the following formula, adjusting the cell reference to match the top-left cell of your selected range:
=COUNTIF($A$1:$A1,A1)=1Let’s break down this formula:
COUNTIF(range, criteria): This is the core of the validation. It counts the number of times a specific value (the criteria) appears within a given range.$A$1:$A1: This is the expanding range. The first$A$1is an absolute reference, meaning it will always refer to cell A1, regardless of which cell the formula is applied to. The secondA1is a relative reference; as the formula is applied to subsequent cells (A2, A3, etc.), this part of the range will expand (to A2, A3, etc.). Therefore, when the formula is applied to cell A2, the range becomes$A$1:$A2; when applied to A3, the range becomes$A$1:$A3, and so on. This creates a dynamically increasing range that covers all cells above the current cell.A1: This is the criteria. It refers to the value in the current cell being validated (e.g., A1 when the formula is applied to cell A1, A2 when applied to A2, etc.).=1: This is the condition. The formula will only allow a value to be entered if theCOUNTIFfunction returns 1, meaning the value has only appeared once within the expanding range (including the current cell). If theCOUNTIFreturns a value greater than 1, it means the value is a duplicate.
Important: Adjust the
A1references in the formula to match the top-left cell of your selected range. For example, if you selected the rangeC5:C20, your formula should be=COUNTIF($C$5:$C5,C5)=1. - Customize the Error Alert (Optional but Highly Recommended):
Go to the “Error Alert” tab in the Data Validation dialog box. This allows you to display a custom message when a user tries to enter a duplicate value.
- Style: Choose the style of the alert (Stop, Warning, or Information). “Stop” is the most restrictive and prevents the user from entering the duplicate value. “Warning” and “Information” allow the user to proceed but display a message. “Stop” is generally recommended for preventing duplicates.
- Title: Enter a title for the error message (e.g., “Duplicate Entry”).
- Error Message: Enter a clear and informative error message (e.g., “This value already exists in the list. Please enter a unique value.”).
A well-crafted error message will greatly improve the user experience and prevent frustration.
- Customize the Input Message (Optional):
Go to the “Input Message” tab to display a message to the user when they select a cell in the validated range. This message can provide instructions or context (e.g., “Enter a unique product ID”).
- Apply the Validation:
Click “OK” to apply the data validation rule to the selected range. Now, when a user tries to enter a value that already exists in the range, Excel will display the error alert (if configured) and prevent the entry.
Important Considerations and Tips
- Case Sensitivity: Data validation, by default, is case-insensitive. This means that “apple” and “Apple” will be considered duplicates. If you need case-sensitive validation, you’ll need a more complex formula involving the
EXACTfunction. A possible formula would be:=SUMPRODUCT(--(EXACT($A$1:$A1,A1)))=1. This is more computationally intensive and might slow down very large spreadsheets. - Blank Cells: The standard
COUNTIFformula treats blank cells as values. If you want to allow blank cells but prevent other duplicates, you’ll need to modify the formula. One approach is:=OR(ISBLANK(A1),COUNTIF($A$1:$A1,A1)=1). This formula allows blank cells and only restricts non-blank duplicates. - Copying and Pasting: Be aware that users can bypass data validation by copying and pasting values into the validated range. To prevent this, you can consider protecting the sheet (with or without a password), although this is a more restrictive measure.
- Applying to Entire Columns: While it’s tempting to apply data validation to an entire column (e.g., “A:A”), this can significantly slow down Excel, especially for large spreadsheets. It’s better to define a reasonable range based on your expected data size. You can always extend the range later if needed.
- Combining with Other Validation Rules: You can combine the duplicate prevention rule with other data validation rules (e.g., restricting data to a specific data type or a list of values). This provides even greater control over the data entered into your spreadsheet.
- Removing Data Validation: To remove data validation from a range of cells, select the range, go to Data Validation, and click “Clear All” on the “Settings” tab.
- Testing Thoroughly: After setting up data validation, thoroughly test it by entering various values, including duplicates (both intentional and accidental), to ensure it’s working as expected.
Example Scenarios
- Customer ID Database: Prevent duplicate customer IDs from being entered into your database.
- Product Catalog: Ensure that each product has a unique product code.
- Email Marketing List: Prevent duplicate email addresses, which can lead to deliverability issues.
- Survey Responses: Prevent the same person from submitting multiple responses to a survey.
Conclusion
Using data validation to prevent duplicates is a simple yet incredibly effective way to maintain data integrity in Excel. By implementing these steps and considering the additional tips, you can ensure the accuracy and reliability of your spreadsheets, saving time and preventing costly errors in the long run. Taking the time to set up data validation properly is a worthwhile investment that will pay dividends in improved data quality and more efficient data management.
“`
 636×203 excel data validation prevent duplicates from bettersolutions.com
  408×335 preventstop duplicates excel data validation stopprevent excel from www.ozgrid.com
  412×336 prevent duplicate entries column excel from www.extendoffice.com
  493×300 prevent duplicate entries range excel data validation from www.exceltip.com
 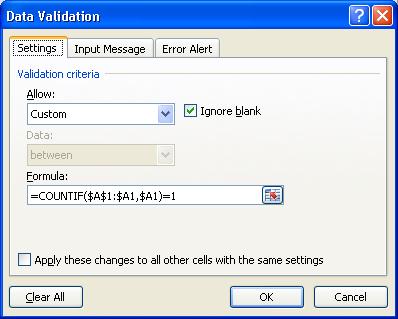 398×319 prevent duplicates excel computergaga from www.computergaga.com
  850×415 prevent duplicates excel template haven from templatehaven.com
  678×365 prevent duplicate entries excel data validationcountif formula from howtoexcelatexcel.com
  521×473 preventing duplicates entering data excel from www.exceltip.com
  1600×976 excel custom data validation unique entries reject from urbizedge.com
 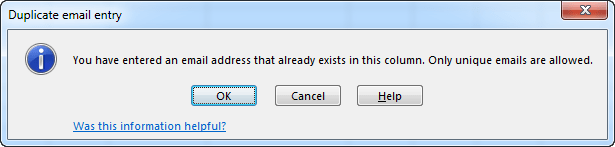 615×147 prevent duplicate entries excel column unique data allowed from ablebits.com
 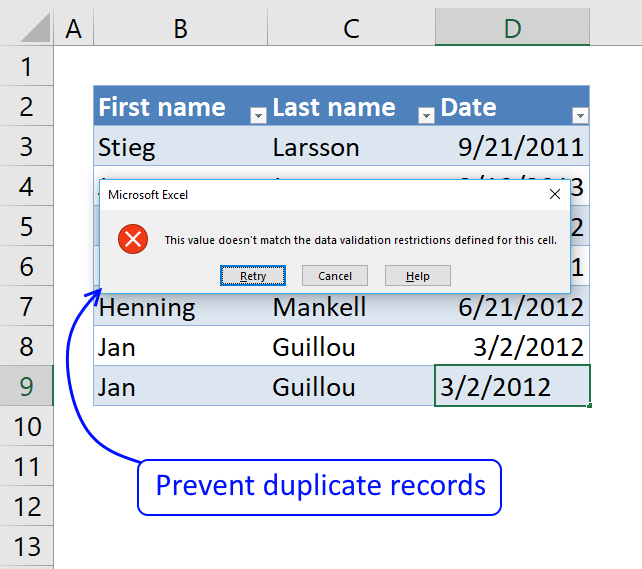 642×569 prevent duplicate records worksheet from www.get-digital-help.com
  530×577 understanding data validation excel from www.universalclass.com
  700×461 prevent duplicate values excel teachexcelcom from www.teachexcel.com
 How To Use Data Validation To Prevent Duplicates In Excel was posted in March 7, 2026 at 11:39 pm. If you wanna have it as yours, please click the Pictures and you will go to click right mouse then Save Image As and Click Save and download the How To Use Data Validation To Prevent Duplicates In Excel Picture.. Don’t forget to share this picture with others via Facebook, Twitter, Pinterest or other social medias! we do hope you'll get inspired by ExcelKayra... Thanks again! If you have any DMCA issues on this post, please contact us!