How To Create Dependent Dropdown Lists In Excel
How To Create Dependent Dropdown Lists In Excel - There are a lot of affordable templates out there, but it can be easy to feel like a lot of the best cost a amount of money, require best special design template. Making the best template format choice is way to your template success. And if at this time you are looking for information and ideas regarding the How To Create Dependent Dropdown Lists In Excel then, you are in the perfect place. Get this How To Create Dependent Dropdown Lists In Excel for free here. We hope this post How To Create Dependent Dropdown Lists In Excel inspired you and help you what you are looking for.
Creating dependent dropdown lists in Excel allows you to build a dynamic and user-friendly data entry system. This means that the options available in one dropdown list change based on the selection made in another dropdown list. This is incredibly useful for categorizing data, narrowing down choices, and preventing invalid entries. Here’s a step-by-step guide on how to achieve this: **Understanding the Concept** The core idea behind dependent dropdowns is to link the source data of one dropdown to the selection in another. You’ll typically have a “parent” dropdown and a “child” dropdown. Selecting an option in the parent dropdown filters the available options in the child dropdown. **Example Scenario** Let’s say you want to create a system for categorizing products by category and subcategory. You’ll have a “Category” dropdown and a “Subcategory” dropdown. Selecting “Electronics” in the Category dropdown will only show subcategories like “TVs,” “Laptops,” and “Smartphones” in the Subcategory dropdown. **Step-by-Step Guide** 1. **Prepare Your Data:** * **Organize Your Data:** The most crucial step is to organize your data logically. Create a table in your Excel sheet that contains all possible options for both the parent and child dropdowns. This table will act as your data source. For our example, it might look like this: | Category | Subcategory | |————-|—————–| | Electronics | TVs | | Electronics | Laptops | | Electronics | Smartphones | | Clothing | Shirts | | Clothing | Pants | | Clothing | Dresses | | Food | Fruits | | Food | Vegetables | | Food | Dairy Products | * **Consider Empty Values:** Decide how you want to handle empty selections in the parent dropdown. Do you want the child dropdown to be empty, show all options, or display a “Please Select a Category” message? We’ll address this later. 2. **Create Named Ranges:** * **Category Range:** Select the column containing your categories (e.g., the entire “Category” column from your data table, including the header). Go to the “Formulas” tab and click “Define Name.” Name this range “CategoryList.” Make sure the “Refers to” field correctly points to your category column. Using `OFFSET` for dynamic ranges is discussed later. * **Subcategory Ranges (Crucial Step):** This is where the magic happens. You’ll create named ranges for each category, containing the corresponding subcategories. * Select the **Subcategory** values corresponding to the **first** category (e.g., just “TVs,” “Laptops,” and “Smartphones” from the example data). Go to the “Formulas” tab, and in the “Defined Names” group, click “Create from Selection.” * In the “Create Names from Values in the:” dialog box, make sure “Left column” is selected. This will use the values in the *adjacent* left column (the category name) to name the range. Click “OK”. Excel will automatically create a named range using the category name as the range name. So, in our example, it will create a named range called “Electronics”. * Repeat this process for *every* category. Select the subcategory values for “Clothing” and create a named range called “Clothing.” Do the same for “Food” and create a named range called “Food.” * **Important:** The names of these subcategory ranges must *exactly* match the category names in your “CategoryList” range. If there are spaces in your category names (e.g., “Dairy Products”), your named ranges will need to reflect that as well (“Dairy Products”). 3. **Create the Dropdown Lists:** * **Category Dropdown:** Select the cell where you want the category dropdown to appear. * Go to the “Data” tab. * Click “Data Validation.” * In the “Settings” tab, under “Allow,” choose “List.” * In the “Source” field, type `=CategoryList` (or the name you gave to your category range). * Click “OK.” * **Subcategory Dropdown:** Select the cell where you want the subcategory dropdown to appear. * Go to the “Data” tab. * Click “Data Validation.” * In the “Settings” tab, under “Allow,” choose “List.” * In the “Source” field, type `=INDIRECT(A1)` (replace “A1” with the *cell* containing your **Category** dropdown). `INDIRECT` is the key function here. It takes the *text* value in cell A1 (your selected category) and uses it as the name of the named range to pull data from. * Click “OK.” 4. **Test and Refine:** * Select a category from the Category dropdown. The Subcategory dropdown should now only show the subcategories related to that selected category. * Test each category to ensure the subcategory dropdown correctly filters the options. **Handling Empty Selections** If you want the subcategory dropdown to be empty when no category is selected: * In the “Data Validation” settings for the Subcategory dropdown, go to the “Error Alert” tab. * Check the “Show error alert after invalid data is entered” box. * Change the “Style” to “Information” or “Warning.” * In the “Title,” enter something like “No Category Selected.” * In the “Error message,” enter “Please select a category first.” If you want to display a default “Please Select a Category” message in the Subcategory dropdown: 1. Create a named range containing the single value “Please Select a Category”. Let’s call this range `DefaultSubcategory`. 2. Modify the “Source” of the Subcategory dropdown’s Data Validation to: `=IF(ISBLANK(A1), DefaultSubcategory, INDIRECT(A1))` (Again, replace A1 with the category dropdown’s cell). This formula checks if the category cell is blank. If it is, it uses the `DefaultSubcategory` range; otherwise, it uses the `INDIRECT` function as before. **Dynamic Ranges with OFFSET (Handling Added Data)** The solution above works well, but if you add new categories or subcategories to your data table, you’ll need to manually update the named ranges. To make your system more dynamic, you can use the `OFFSET` function. Instead of selecting fixed ranges, `OFFSET` allows the named range to automatically expand or shrink as your data changes. Here’s how to use `OFFSET` for the `CategoryList` range: 1. **Assuming your Category data starts in A2** (A1 being the header), go to “Formulas” -> “Name Manager” and find your “CategoryList” range. 2. Edit the “Refers to” field to: `=OFFSET(Sheet1!$A$2,0,0,COUNTA(Sheet1!$A:$A)-1,1)` (Change “Sheet1” to your sheet name if needed). * `OFFSET(reference, rows, cols, height, width)` * `Sheet1!$A$2`: The starting cell (top-left of your category data). * `0, 0`: No rows or columns to offset from the starting cell. * `COUNTA(Sheet1!$A:$A)-1`: The height (number of rows) of the range. `COUNTA` counts all non-empty cells in column A. We subtract 1 to exclude the header row. * `1`: The width (number of columns) of the range (1 column for the category). For dynamic subcategory ranges, it is best to use VBA code due to limitations with `OFFSET` and `INDIRECT` combinations within Data Validation. **Limitations and Considerations** * **Complexity with Multiple Levels:** Creating dependent dropdowns with more than two levels (e.g., Category -> Subcategory -> Product) can become complex quickly. Consider alternative solutions like VBA or Power Query for more complex scenarios. * **VBA for Advanced Logic:** If you need more sophisticated logic (e.g., filtering based on multiple criteria or dynamically creating new named ranges), VBA is often the best option. * **Data Consistency:** The success of this method relies heavily on the accuracy and consistency of your source data. Ensure that the category names in your data table exactly match the names used for the subcategory named ranges. * **Performance:** With very large datasets, the `INDIRECT` function can sometimes impact performance. Test your spreadsheet thoroughly to ensure it remains responsive. **HTML Implementation (For Web)** The above solution is for Excel itself. If you are displaying this data on a webpage, you would need to export the data from Excel (usually as a CSV or JSON file) and then use client-side scripting (JavaScript) to dynamically populate the dropdowns based on user selections. The core logic would remain the same: read the data, create a mapping of parent categories to child subcategories, and then use JavaScript to update the options in the second dropdown when the first dropdown changes. Libraries like jQuery can simplify the DOM manipulation required. By following these steps, you can create dynamic and intuitive dependent dropdown lists in Excel, improving data entry accuracy and simplifying data analysis. Remember to plan your data structure carefully and test your implementation thoroughly to ensure it works as expected.
 700×314 dependent dropdown lists excel exceljet from exceljet.net
 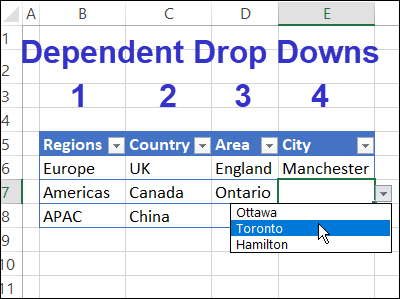 400×299 choose excel dependent drop setup method from www.contextures.com
  600×315 dependent drop lists excel step step tutorial from www.excel-easy.com
  521×362 create dependent drop lists excel campus from www.excelcampus.com
 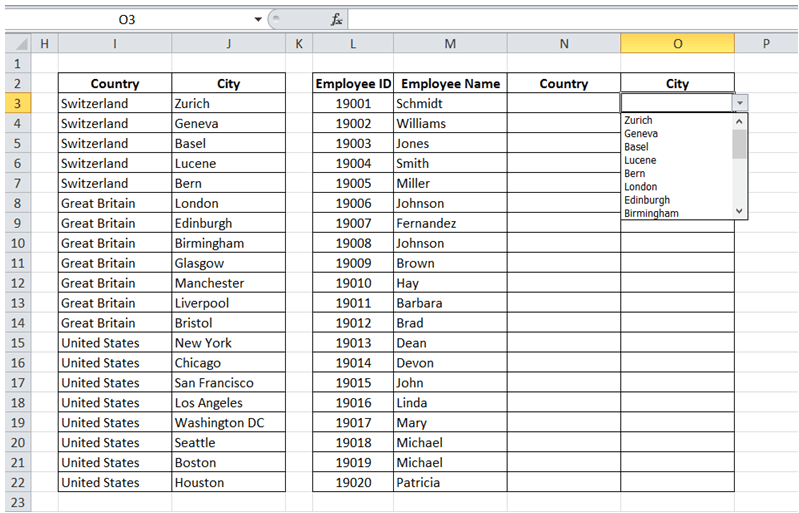 799×513 excelmadeeasy dependent drop lists excel from excelmadeeasy.com
  919×544 create dependent drop list excel gyankosh from gyankosh.net
  908×438 create dependent drop list excel xl cad from xlncad.com
  434×177 create dependent drop list excel from trumpexcel.com
  616×212 creating dependent drop list excel step step tutorial from trumpexcel.com
 How To Create Dependent Dropdown Lists In Excel was posted in February 24, 2026 at 6:12 pm. If you wanna have it as yours, please click the Pictures and you will go to click right mouse then Save Image As and Click Save and download the How To Create Dependent Dropdown Lists In Excel Picture.. Don’t forget to share this picture with others via Facebook, Twitter, Pinterest or other social medias! we do hope you'll get inspired by ExcelKayra... Thanks again! If you have any DMCA issues on this post, please contact us!