Dental Clinic Inventory List Excel Format
Dental Clinic Inventory List Excel Format - There are a lot of affordable templates out there, but it can be easy to feel like a lot of the best cost a amount of money, require best special design template. Making the best template format choice is way to your template success. And if at this time you are looking for information and ideas regarding the Dental Clinic Inventory List Excel Format then, you are in the perfect place. Get this Dental Clinic Inventory List Excel Format for free here. We hope this post Dental Clinic Inventory List Excel Format inspired you and help you what you are looking for.
“`html
Dental Clinic Inventory List in Excel: A Comprehensive Guide
Efficient inventory management is crucial for the smooth operation of any dental clinic. A well-maintained inventory ensures that necessary supplies are always available, minimizing disruptions and maximizing productivity. Excel provides a versatile and accessible platform for creating and managing a dental clinic inventory list. This guide will walk you through the process of setting up and effectively utilizing an Excel-based inventory system.
Why Use Excel for Dental Clinic Inventory?
- Cost-Effective: Excel is often already available in most offices, eliminating the need for expensive dedicated inventory management software.
- Customizable: Excel allows for complete customization to fit the specific needs and workflows of your dental clinic.
- User-Friendly: Most staff members are familiar with Excel’s basic functions, making it easy to learn and use.
- Scalable: Excel can handle a significant amount of data, making it suitable for both small and large clinics.
- Reporting Capabilities: Excel provides tools for generating reports and analyzing inventory data.
Creating Your Dental Clinic Inventory List in Excel
Follow these steps to create a comprehensive inventory list in Excel:
1. Setting up the Spreadsheet
- Open Excel: Launch Microsoft Excel on your computer.
- Create a New Worksheet: Start with a blank worksheet.
- Define Column Headers: These headers will represent the different attributes of each inventory item. Common headers include:
- Item ID (SKU): A unique identifier for each product.
- Item Name: The descriptive name of the item (e.g., “Prophy Paste – Mint”).
- Category: Grouping items into categories (e.g., “Restorative Materials,” “Sterilization Supplies”).
- Manufacturer: The company that produces the item.
- Supplier: The vendor you purchase the item from.
- Unit of Measure: How the item is measured (e.g., “Box,” “Each,” “Milliliter”).
- Reorder Point: The minimum quantity that triggers a reorder.
- Par Level: The ideal quantity to keep in stock.
- Quantity on Hand: The current amount of the item in stock.
- Date Received: The date the item was last received.
- Expiration Date: The date the item expires (if applicable).
- Cost per Unit: The price paid for each unit of the item.
- Location: Where the item is stored (e.g., “Sterilization Room,” “Operatory 1”).
- Notes: Any additional information, such as special handling instructions.
- Formatting: Format the column headers to make them visually distinct (e.g., bold, different background color). Adjust column widths to accommodate the data.
2. Populating the Inventory List
- Enter Data: Carefully enter the information for each item in your inventory, filling in all relevant columns.
- Be Consistent: Use consistent naming conventions and units of measure to avoid confusion. For example, always use “Box” instead of sometimes “bx” or “carton.”
- Assign Item IDs: Create a systematic approach to assigning Item IDs (SKUs). This could be based on category, supplier, or a combination of both.
- Expiration Date Tracking: For items with expiration dates, be sure to enter these accurately. Excel can be used to automatically highlight items nearing expiration (see section on Conditional Formatting).
3. Implementing Formulas and Functions
- Calculate Total Value: Use a formula to calculate the total value of each item in stock (Quantity on Hand * Cost per Unit). Add a column for “Total Value” and use the following formula:
=Quantity on Hand * Cost per Unit(replace “Quantity on Hand” and “Cost per Unit” with the actual cell references). - Calculate Total Inventory Value: Use the SUM function to calculate the total value of all items in your inventory. At the bottom of the “Total Value” column, use the formula:
=SUM(range of Total Value cells). - Reorder Alert: Create a column to indicate when an item needs to be reordered. Use an IF statement to compare the Quantity on Hand to the Reorder Point. For example:
=IF(Quantity on Hand < Reorder Point, "REORDER", "")(replace "Quantity on Hand" and "Reorder Point" with the actual cell references).
4. Using Data Validation
Data validation helps ensure data accuracy and consistency.
- Create Drop-Down Lists: For columns like "Category," "Manufacturer," and "Supplier," create drop-down lists to restrict entries to a predefined set of values. This minimizes errors and ensures consistency.
- To create a drop-down list:
- Select the cells where you want the drop-down list.
- Go to the "Data" tab and click "Data Validation."
- In the "Settings" tab, choose "List" from the "Allow" drop-down.
- In the "Source" field, enter the list of values separated by commas (e.g., "Restorative Materials, Sterilization Supplies, Impression Materials") or reference a range of cells containing the list.
- Click "OK."
- Date Validation: For the "Date Received" and "Expiration Date" columns, set data validation rules to ensure that only valid dates are entered.
5. Applying Conditional Formatting
Conditional formatting can visually highlight important information, such as items that need to be reordered or are nearing expiration.
- Reorder Alerts: Highlight rows where the "Reorder Alert" column contains "REORDER."
- Expiration Dates: Highlight items nearing expiration. For example, highlight items expiring within the next 30 days.
- Select the "Expiration Date" column.
- Go to the "Home" tab and click "Conditional Formatting."
- Choose "Highlight Cells Rules" and then "Date Occurring."
- Select "Next 30 days" and choose a highlighting color.
- Click "OK."
6. Sorting and Filtering
Use sorting and filtering to quickly find and analyze data.
- Sorting: Sort the inventory list by Item Name, Category, or Expiration Date to easily locate specific items or identify items nearing expiration.
- Filtering: Filter the inventory list to show only items from a specific manufacturer, supplier, or category.
7. Regular Updates and Audits
An inventory list is only effective if it is kept up-to-date.
- Regular Updates: Update the inventory list whenever items are received or used.
- Physical Inventory Audits: Conduct regular physical inventory audits to compare the quantities listed in Excel to the actual quantities on hand. This helps identify discrepancies and ensures accuracy.
- Record Adjustments: Document any adjustments made to the inventory list due to discrepancies found during audits.
Advanced Excel Techniques for Inventory Management
- Pivot Tables: Use pivot tables to summarize and analyze inventory data. For example, create a pivot table to show the total value of inventory by category.
- Macros: Automate repetitive tasks, such as generating reports or updating inventory levels.
- Connecting to External Databases: If your clinic uses a separate database for patient management or billing, consider linking your Excel inventory list to the database for real-time inventory tracking.
Conclusion
Implementing a dental clinic inventory list in Excel is a practical and efficient way to manage your supplies. By following the steps outlined in this guide, you can create a customized system that meets the specific needs of your clinic. Remember to maintain the list diligently and regularly audit your inventory to ensure accuracy. A well-managed inventory will contribute to a smoother, more efficient, and more profitable dental practice.
```
 1032×800 dental inventory spreadsheet db excelcom from db-excel.com
 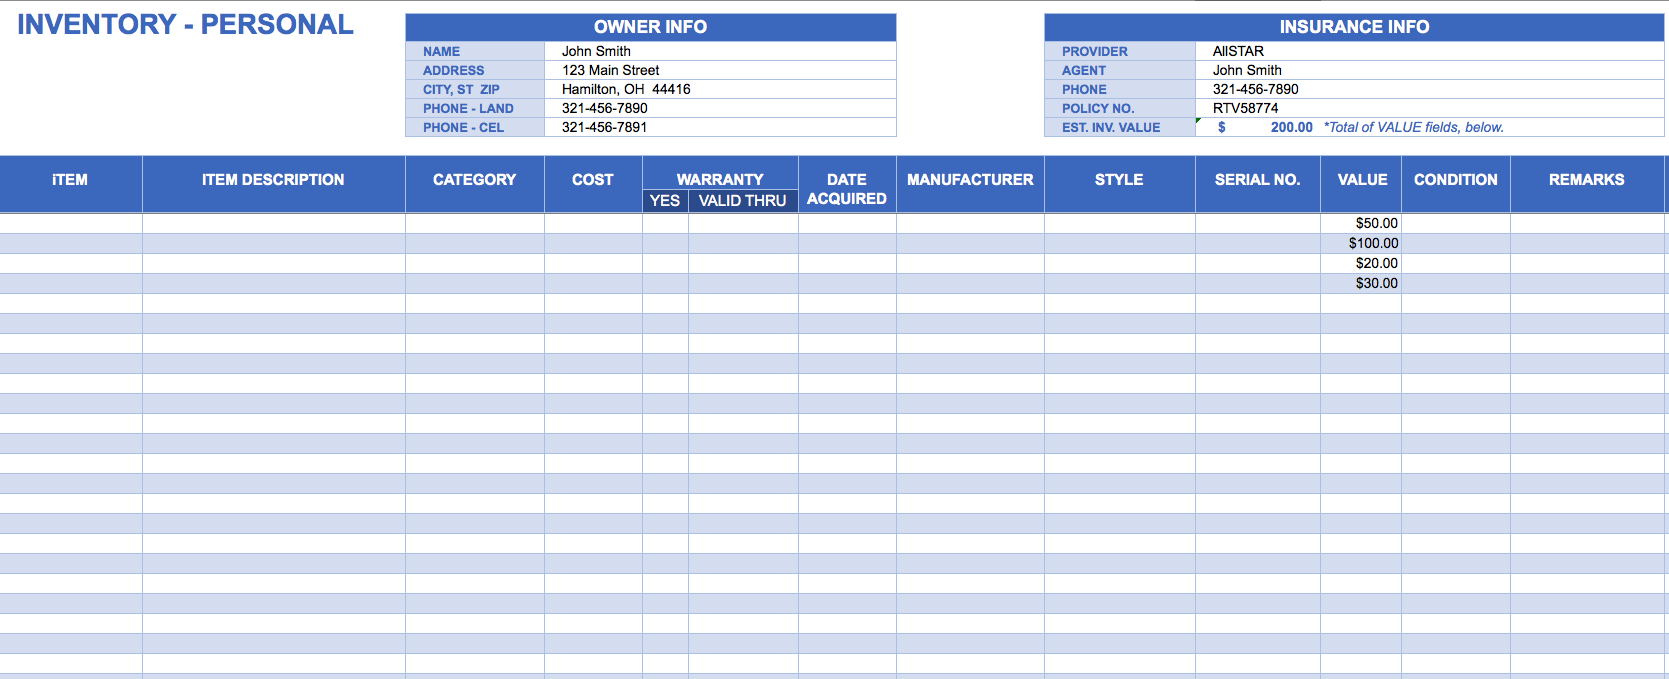 1669×679 dental inventory spreadsheet regard inventory checklist from db-excel.com
  791×1024 dental inventory spreadsheet spreadsheet downloa dental office from db-excel.com
  1275×1650 inventory spreadsheet template dental inventory list from www.heritagechristiancollege.com
  600×730 dental office inventory template tutoreorg master documents from tutore.org
  2550×3300 dental office inventory templates allbusinesstemplatescom from www.allbusinesstemplates.com
 Dental Clinic Inventory List Excel Format was posted in September 4, 2025 at 1:14 pm. If you wanna have it as yours, please click the Pictures and you will go to click right mouse then Save Image As and Click Save and download the Dental Clinic Inventory List Excel Format Picture.. Don’t forget to share this picture with others via Facebook, Twitter, Pinterest or other social medias! we do hope you'll get inspired by ExcelKayra... Thanks again! If you have any DMCA issues on this post, please contact us!