How To Create A Budget Planner With Savings Goals In Excel
How To Create A Budget Planner With Savings Goals In Excel - There are a lot of affordable templates out there, but it can be easy to feel like a lot of the best cost a amount of money, require best special design template. Making the best template format choice is way to your template success. And if at this time you are looking for information and ideas regarding the How To Create A Budget Planner With Savings Goals In Excel then, you are in the perfect place. Get this How To Create A Budget Planner With Savings Goals In Excel for free here. We hope this post How To Create A Budget Planner With Savings Goals In Excel inspired you and help you what you are looking for.
“`html
Creating a Budget Planner with Savings Goals in Excel
Excel is a powerful tool for managing your finances and achieving your savings goals. This guide will walk you through creating a budget planner that tracks your income, expenses, and progress toward your savings targets.
Setting Up Your Spreadsheet
1. Open a New Excel Workbook:
Launch Excel and create a new blank workbook. This will be your budget’s home.
2. Name Your Tabs:
At the bottom of the screen, you’ll see “Sheet1”. Rename it to something descriptive like “Budget” or “Monthly Budget”. Consider creating additional sheets for “Savings Goals”, “Income”, and “Expense Tracking” for better organization. Right-click on the sheet tab and select “Rename”.
3. Column Headers:
In your “Budget” sheet, create column headers to organize your information. Here are some essential columns to start with:
- Category: (e.g., Housing, Transportation, Food, Entertainment, Savings)
- Subcategory: (e.g., Rent, Mortgage, Gas, Groceries, Dining Out)
- Budgeted Amount: The amount you plan to spend in each category.
- Actual Amount: The amount you actually spent.
- Difference: (Budgeted Amount – Actual Amount) This shows if you’re over or under budget.
- Notes: For any specific details or explanations.
Feel free to add more columns as needed, such as due dates for bills or the payment method used.
Setting Up Your Income Section
Create an “Income” section within your “Budget” sheet or on a separate “Income” sheet. This will track all sources of income.
1. Income Sources:
List all your income sources in the first column (e.g., Salary, Side Hustle, Investments). Add rows for each source.
2. Expected Amount:
In the next column, enter the expected amount for each income source for the month.
3. Actual Amount:
Add another column to track the actual amount received from each income source. You can update this column as income arrives throughout the month.
4. Formula for Total Income:
At the bottom of your income section, use the `SUM` function to calculate your total income. For example, if your income amounts are in cells B2:B10, the formula would be `=SUM(B2:B10)`.
Planning Your Expenses
This is the heart of your budget. Carefully categorize and estimate your expenses.
1. Categories and Subcategories:
Break down your expenses into broad categories (e.g., Housing, Transportation) and then into more specific subcategories (e.g., Rent, Mortgage, Gas, Car Insurance). This level of detail helps you identify areas where you can cut back.
2. Fixed vs. Variable Expenses:
Distinguish between fixed expenses (e.g., rent, loan payments) that are consistent each month and variable expenses (e.g., groceries, entertainment) that fluctuate. This helps you anticipate your spending better.
3. Budgeted Amounts:
For each subcategory, estimate how much you plan to spend. Use your past spending habits as a guide. If you’re unsure, err on the side of caution and overestimate.
Tracking Your Actual Expenses
This is where you record your actual spending throughout the month.
1. Regularly Update:
Make a habit of updating your “Actual Amount” column regularly. Ideally, do this daily or every few days. The more frequently you update, the more accurate your budget will be.
2. Expense Tracking Sheet (Optional):
Consider creating a separate “Expense Tracking” sheet to record individual transactions. This allows for even greater detail and analysis. Columns could include: Date, Category, Subcategory, Description, Amount, Payment Method.
3. Formulas to Link Actual Amounts:
If you’re using an “Expense Tracking” sheet, use the `SUMIF` function to automatically populate the “Actual Amount” column in your “Budget” sheet. This function sums values based on a specific criteria. For example, if your “Expense Tracking” sheet has categories in column A and amounts in column B, and your “Budget” sheet has categories in column A, the formula in the “Actual Amount” column of your “Budget” sheet would look like this: `=SUMIF(‘Expense Tracking’!A:A,A2,’Expense Tracking’!B:B)` This formula says: “Look in column A of the ‘Expense Tracking’ sheet (the range) for the category in cell A2 of the current sheet (the criteria), and if you find a match, sum the corresponding values in column B of the ‘Expense Tracking’ sheet (the sum_range).”
Calculating Differences and Analyzing Your Budget
1. Difference Formula:
In the “Difference” column of your “Budget” sheet, enter the formula to calculate the difference between your budgeted amount and your actual amount. This is simply `=C2-D2` (assuming “Budgeted Amount” is in column C and “Actual Amount” is in column D, starting in row 2).
2. Conditional Formatting:
Use conditional formatting to highlight areas where you are over or under budget. For example, you can format cells in the “Difference” column to turn red if the value is negative (meaning you went over budget) and green if the value is positive (meaning you stayed under budget). To do this, select the “Difference” column, go to “Conditional Formatting” on the “Home” tab, choose “Highlight Cells Rules”, and then “Less Than” and set the value to 0. Choose a red fill. Then repeat the process, choosing “Greater Than” and setting the value to 0, and choosing a green fill.
3. Analyze and Adjust:
Review your budget regularly. Where are you consistently overspending? Where are you underspending? Adjust your budgeted amounts accordingly to create a more realistic and effective budget.
Setting and Tracking Savings Goals
Create a “Savings Goals” sheet or section within your “Budget” sheet to define and track your savings targets.
1. Goal Description:
List each savings goal (e.g., Emergency Fund, Down Payment, Vacation).
2. Target Amount:
Enter the total amount you need to save for each goal.
3. Current Savings:
Record the amount you’ve already saved toward each goal.
4. Monthly Contribution:
Enter the amount you plan to contribute to each goal each month.
5. Formula for Projected Savings:
Create a column to calculate your projected savings after the monthly contribution: `=C2+D2` (assuming “Current Savings” is in column C and “Monthly Contribution” is in column D).
6. Formula for Remaining Amount:
Calculate the amount remaining to be saved: `=B2-E2` (assuming “Target Amount” is in column B and “Projected Savings” is in column E).
7. Timeline (Optional):
Add columns to estimate the timeframe for achieving each goal based on your current savings and monthly contributions. This requires a more complex formula involving the target amount, current savings, and monthly contribution to estimate the number of months required.
8. Progress Visualization (Optional):
Use charts and graphs to visualize your savings progress. A simple bar chart showing “Current Savings” versus “Target Amount” can be very motivating.
Automating and Enhancing Your Budget
1. Drop-Down Lists:
Use data validation to create drop-down lists for your categories and subcategories. This ensures consistency and reduces data entry errors. Select the column where you want the drop-down, go to the “Data” tab, choose “Data Validation”, and then select “List” from the “Allow” drop-down. Enter your list of categories or subcategories, separated by commas, in the “Source” field.
2. Pivot Tables:
Use pivot tables to summarize and analyze your spending data. For example, you can create a pivot table to see your total spending by category for the month or over a longer period.
3. Excel Templates:
Consider using pre-built Excel budget templates as a starting point. These templates often include pre-defined categories, formulas, and charts that can save you time and effort. You can find templates by searching online or within Excel itself (File > New).
4. Regular Review and Adjustment:
The key to a successful budget is regular review and adjustment. Track your spending, analyze your data, and make changes to your budget as needed to stay on track toward your financial goals. Don’t be afraid to experiment and find what works best for you.
By following these steps, you can create a powerful budget planner in Excel that helps you manage your finances, track your expenses, and achieve your savings goals.
“`
 2240×1260 budget excel template prepare budget minutes from www.frugalbeat.com
 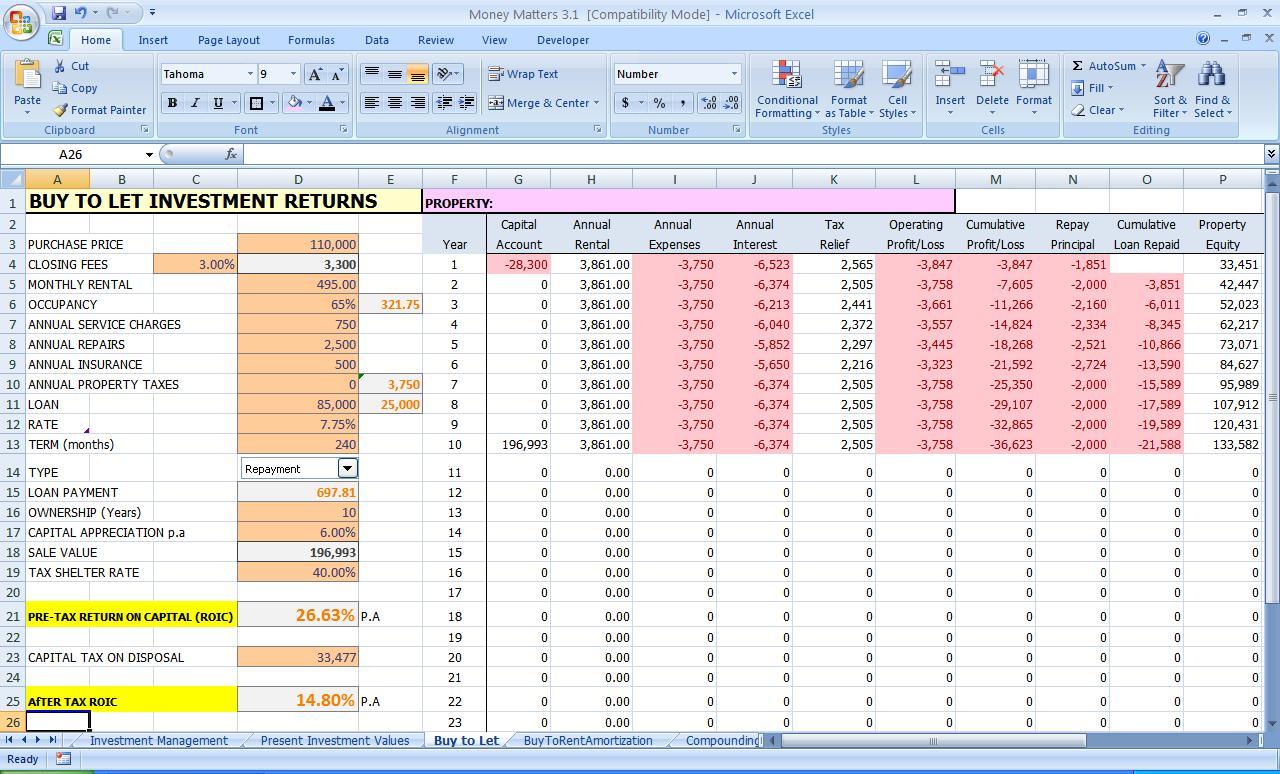 1280×774 budget planner template db excelcom from db-excel.com
  1123×546 budget planner excel templates purpose from www.excel-template.net
  1268×802 comprehensive budget planner spreadsheet excel spreadsheet from db-excel.com
  700×965 family budget planner budget spreadsheet excel from www.spreadsheet123.com
  675×520 excel budget planner template from lesboucans.com
  1140×674 budget savings excel spreadsheet template automated etsy from www.etsy.com
  993×630 investor juan ways excel budget planner from www.investorjuan.com
  1400×859 personal budget excel spreadsheet monthly yearly budget from db-excel.com
 How To Create A Budget Planner With Savings Goals In Excel was posted in October 22, 2025 at 2:07 am. If you wanna have it as yours, please click the Pictures and you will go to click right mouse then Save Image As and Click Save and download the How To Create A Budget Planner With Savings Goals In Excel Picture.. Don’t forget to share this picture with others via Facebook, Twitter, Pinterest or other social medias! we do hope you'll get inspired by ExcelKayra... Thanks again! If you have any DMCA issues on this post, please contact us!