How To Create Nested If Statements In Excel
How To Create Nested If Statements In Excel - There are a lot of affordable templates out there, but it can be easy to feel like a lot of the best cost a amount of money, require best special design template. Making the best template format choice is way to your template success. And if at this time you are looking for information and ideas regarding the How To Create Nested If Statements In Excel then, you are in the perfect place. Get this How To Create Nested If Statements In Excel for free here. We hope this post How To Create Nested If Statements In Excel inspired you and help you what you are looking for.
“`html
Nested IF Statements in Excel: A Comprehensive Guide
Excel’s IF function is a powerful tool for performing conditional logic. However, its true potential shines when you nest multiple IF functions together. This allows you to create complex decision-making processes within your spreadsheets, evaluating multiple conditions and returning different results based on the outcome.
Understanding the Basic IF Function
Before diving into nested IFs, let’s quickly recap the structure of a standard IF function:
=IF(logical_test, value_if_true, value_if_false)
logical_test: This is the condition you’re evaluating. It must result in either TRUE or FALSE. Examples include checking if a cell value is greater than a certain number, equal to a specific text string, or blank.value_if_true: The value returned if thelogical_testis TRUE. This can be a number, text, another formula, or even a blank cell (“”).value_if_false: The value returned if thelogical_testis FALSE. Likevalue_if_true, this can be a number, text, another formula, or a blank cell.
For instance, =IF(A1>10, "Yes", "No") will display “Yes” in the cell if the value in cell A1 is greater than 10, and “No” otherwise.
What are Nested IF Statements?
A nested IF statement is simply an IF function placed inside another IF function, either as the value_if_true or value_if_false argument (or both). This allows you to test multiple conditions sequentially. If the first condition is false, instead of returning a final value, the formula moves on to evaluate another IF function.
Syntax of a Nested IF Statement
The general structure of a nested IF statement looks like this:
=IF(logical_test1, value_if_true1, IF(logical_test2, value_if_true2, value_if_false2))
Or, with more levels of nesting:
=IF(logical_test1, value_if_true1, IF(logical_test2, value_if_true2, IF(logical_test3, value_if_true3, value_if_false3)))
As you can see, each IF function handles a single condition. If the first condition (logical_test1) is false, the formula moves on to the second IF function, and so on. The final value_if_false (value_if_false3 in the second example) is only returned if all preceding logical tests are false.
Example 1: Grading System
Let’s create a grading system based on numerical scores:
- 90 or above: A
- 80-89: B
- 70-79: C
- 60-69: D
- Below 60: F
Assuming the score is in cell A1, the nested IF formula would be:
=IF(A1>=90, "A", IF(A1>=80, "B", IF(A1>=70, "C", IF(A1>=60, "D", "F"))))
Explanation:
- The formula first checks if the score (A1) is greater than or equal to 90. If it is, it returns “A”.
- If the score is less than 90, it moves to the next
IFfunction, checking if A1 is greater than or equal to 80. If so, it returns “B”. - This process continues, checking for grades “C” and “D”.
- Finally, if none of the previous conditions are met (i.e., the score is less than 60), the formula returns “F”.
Example 2: Commission Calculation
Let’s calculate commission based on sales amount:
- Sales >= $10,000: 10% commission
- Sales >= $5,000 and < $10,000: 5% commission
- Sales < $5,000: 2% commission
Assuming the sales amount is in cell B1, the formula could be:
=IF(B1>=10000, B1*0.1, IF(B1>=5000, B1*0.05, B1*0.02))
Explanation:
- The formula first checks if the sales (B1) is greater than or equal to $10,000. If it is, it calculates the commission as 10% of the sales.
- If the sales are less than $10,000, the formula moves to the next
IFfunction, checking if B1 is greater than or equal to $5,000. If so, it calculates the commission as 5% of the sales. - Finally, if the sales are less than $5,000, the formula calculates the commission as 2% of the sales.
Best Practices and Tips
- Keep it Simple: While nesting IFs is powerful, too many levels can make the formula difficult to read and debug. If you find yourself needing more than 3-4 levels of nesting, consider alternative approaches (see below).
- Use Indentation and Line Breaks: To improve readability, format your formula with indentation and line breaks. While Excel ignores these in the formula itself, they make it much easier for humans to understand the logic. For example:
=IF(A1>=90, "A", IF(A1>=80, "B", IF(A1>=70, "C", IF(A1>=60, "D", "F" ) ) ) )
- Plan Your Logic Carefully: Before you start writing the formula, map out the different conditions and their corresponding results. This will help you structure the nested IFs logically. Consider using a decision tree or flowchart.
- Test Thoroughly: After creating the formula, test it with various input values to ensure it produces the correct results in all scenarios. Pay particular attention to boundary conditions (e.g., exactly 90, exactly 80, etc., in the grading example).
- Consider Alternative Functions: For more complex scenarios, consider using alternative functions like
VLOOKUP,HLOOKUP,INDEX/MATCH, orIFS(available in Excel 2016 and later). These functions can often provide a more concise and readable solution than deeply nested IFs. - The `IFS` Function: The `IFS` function simplifies nested IF statements. Its syntax is:
=IFS(logical_test1, value_if_true1, logical_test2, value_if_true2, ...). It evaluates each logical test in order and returns the corresponding value if the test is TRUE. For the grading example, using `IFS` would look like:=IFS(A1>=90, "A", A1>=80, "B", A1>=70, "C", A1>=60, "D", TRUE, "F"). Note the use of `TRUE` as the final logical test to catch all remaining cases. - Error Handling: Consider adding error handling to your nested IF formulas. For example, if you expect a cell to contain a number but it contains text, your formula might return an error. You can use the
ISNUMBERorISTEXTfunctions within your IF conditions to handle these cases gracefully.
Limitations of Nested IF Statements
Excel has a limit on the number of nested IF functions you can use (64 in recent versions). However, even before reaching that limit, complex nested IFs can become very difficult to manage.
Alternatives to Nested IF Statements
When nested IF statements become too cumbersome, consider these alternatives:
- Lookup Tables with VLOOKUP/HLOOKUP: Create a table that maps conditions to results. Then use
VLOOKUPorHLOOKUPto find the appropriate result based on the input value. This is particularly useful when dealing with many different conditions and results. - INDEX/MATCH: Similar to lookup tables,
INDEXandMATCHprovide a more flexible and powerful alternative toVLOOKUP/HLOOKUP, especially when dealing with more complex table structures. - CHOOSE: The
CHOOSEfunction returns a value from a list based on an index number. It’s useful when you have a limited number of discrete choices. - IFS (Excel 2016 and Later): As mentioned above, the
IFSfunction is a more streamlined way to handle multiple conditions without nesting IFs. - Helper Columns: Break down complex logic into smaller, more manageable steps using helper columns. Each helper column can perform a specific calculation or evaluation, and the final result can be calculated based on the values in the helper columns.
Conclusion
Nested IF statements are a valuable tool for implementing conditional logic in Excel. By understanding their syntax, best practices, and limitations, you can use them effectively to create powerful and dynamic spreadsheets. However, remember to consider alternative approaches when dealing with very complex scenarios to maintain readability and manageability.
“`
 1080×1080 nested statements excel ashley from www.excelbyashley.com
  943×537 vba nested automate excel from www.automateexcel.com
  576×490 chatting excel nested statements from excel-diva.blogspot.com
  600×237 tips nested formulas exceljet from exceljet.net
  511×509 nested formula excel nested formula from www.educba.com
 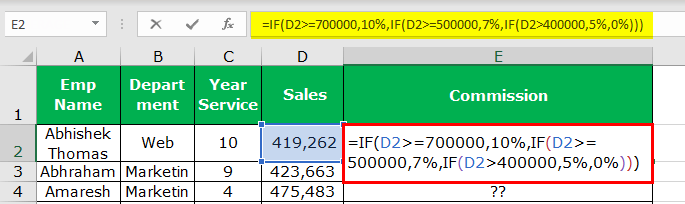 685×204 excel nested function syntax examples from www.wallstreetmojo.com
  521×400 nested functions excel strategies llc from blog.excelstrategiesllc.com
 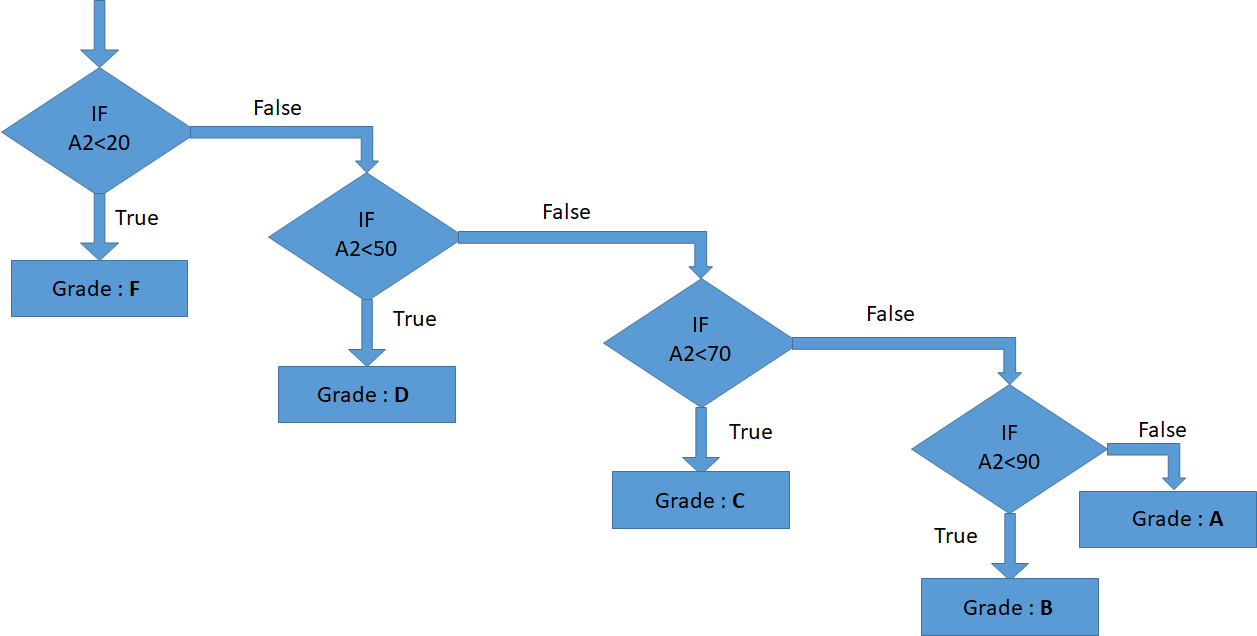 1257×636 nested function excel from www.exceltip.com
 How To Create Nested If Statements In Excel was posted in July 23, 2025 at 10:30 am. If you wanna have it as yours, please click the Pictures and you will go to click right mouse then Save Image As and Click Save and download the How To Create Nested If Statements In Excel Picture.. Don’t forget to share this picture with others via Facebook, Twitter, Pinterest or other social medias! we do hope you'll get inspired by ExcelKayra... Thanks again! If you have any DMCA issues on this post, please contact us!