How To Create Timesheet Excel Template With Overtime Calculations
How To Create Timesheet Excel Template With Overtime Calculations - There are a lot of affordable templates out there, but it can be easy to feel like a lot of the best cost a amount of money, require best special design template. Making the best template format choice is way to your template success. And if at this time you are looking for information and ideas regarding the How To Create Timesheet Excel Template With Overtime Calculations then, you are in the perfect place. Get this How To Create Timesheet Excel Template With Overtime Calculations for free here. We hope this post How To Create Timesheet Excel Template With Overtime Calculations inspired you and help you what you are looking for.
“`html
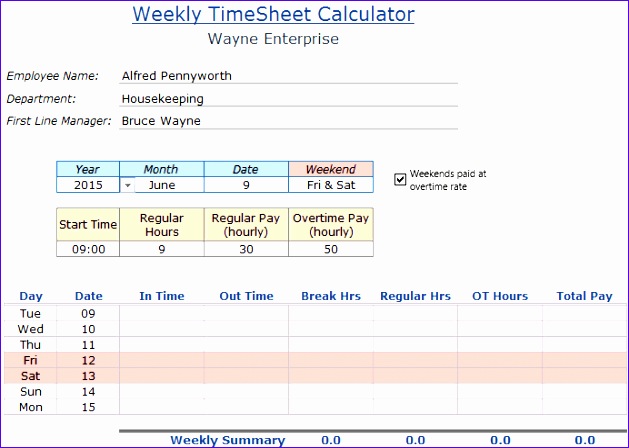
Creating a Timesheet Excel Template with Overtime Calculations
Managing employee work hours effectively is crucial for accurate payroll and efficient resource allocation. A well-designed timesheet template in Excel can streamline this process, especially when it includes automated overtime calculations. This guide provides a step-by-step approach to building such a template.
1. Setting Up the Basic Timesheet Structure
First, open a new Excel workbook. Let’s define the columns we’ll need. At a minimum, these should include:
- Employee Name: For identifying the employee.
- Employee ID: A unique identifier for each employee (optional but recommended).
- Week Ending Date: The date the work week concludes.
- Date: The specific date of the work day.
- Day of the Week: (e.g., Monday, Tuesday) for clarity.
- Time In: The time the employee started working.
- Time Out: The time the employee finished working.
- Lunch Break (Minutes): The duration of the lunch break.
- Regular Hours: The hours worked at the standard rate.
- Overtime Hours: The hours worked exceeding the standard work week.
- Total Hours: The sum of regular and overtime hours.
- Notes: A space for any relevant comments or explanations.
Enter these column headers in the first row of your Excel sheet (e.g., A1:L1). Adjust column widths to accommodate the data you will enter. Consider freezing the top row (View -> Freeze Panes -> Freeze Top Row) to keep the headers visible as you scroll down.
2. Inputting Employee and Week Information
Below the headers, start entering employee information. For “Week Ending Date,” use Excel’s date formatting (Format -> Format Cells -> Number -> Date) to ensure consistency. You can use a dropdown list for the “Day of the Week” column for added convenience and accuracy. To create a dropdown, select the cells in the “Day of the Week” column, then go to Data -> Data Validation. In the “Settings” tab, choose “List” from the “Allow” dropdown and enter “Monday,Tuesday,Wednesday,Thursday,Friday,Saturday,Sunday” (without quotes) in the “Source” field, separated by commas.
3. Calculating Total Hours Worked
The “Total Hours” column (e.g., column K) will calculate the total hours worked each day. Use the following formula (assuming “Time In” is in column F, “Time Out” is in column G, and “Lunch Break (Minutes)” is in column H):
=IF(AND(F2<>"",G2<>""),((G2-F2)*24)-(H2/60),0)This formula does the following:
- IF(AND(F2<>“”,G2<>“”) … ,0): This checks if both “Time In” and “Time Out” fields are filled. If either is blank, it returns 0, preventing errors.
- (G2-F2)*24: Subtracts the “Time In” time from the “Time Out” time. Excel stores times as fractions of a day, so multiplying by 24 converts the result to hours.
- (H2/60): Divides the lunch break minutes by 60 to convert it into hours.
- … – (H2/60): Subtracts the lunch break hours from the total work hours.
Copy this formula down to all rows where you anticipate data entry.
4. Implementing Overtime Calculation
The most important part is calculating overtime. We’ll assume a standard 40-hour work week. The “Regular Hours” (e.g., column I) and “Overtime Hours” (e.g., column J) columns need formulas. We’ll need a running total of hours worked so far in the week.
First, let’s calculate regular hours for each day. This will be the *minimum* of either the total hours for the day *or* the remaining hours until 40 for the week. To do this, we’ll need a helper column. Let’s insert a new column *before* the “Regular Hours” column, and call it “Cumulative Hours”.
In cell H2 (the first row of “Cumulative Hours”), enter 0. Then, in cell H3, enter the following formula:
=H2+K2This adds the “Total Hours” from the *previous* row to the cumulative hours. Copy this formula down to all rows. This will give you a running total of hours worked throughout the week.
Now, for the “Regular Hours” column (now column I):
=IF(H2>=40,0,IF(K2<=(40-H2),K2,40-H2))Here's how this formula works:
- IF(H2>=40,0,...): If the "Cumulative Hours" *before* the current day are already 40 or more, then regular hours are 0.
- IF(K2<=(40-H2),K2,40-H2): If the "Total Hours" for the current day are less than or equal to the remaining hours until 40, then the regular hours are equal to the "Total Hours". Otherwise, the regular hours are equal to the remaining hours until 40.
Finally, for the "Overtime Hours" column (column J):
=IF(H2>=40,K2,IF(K2>(40-H2),K2-(40-H2),0))This formula does the following:
- IF(H2>=40,K2,...): If the "Cumulative Hours" *before* the current day are already 40 or more, then overtime is equal to all the "Total Hours" for that day.
- IF(K2>(40-H2),K2-(40-H2),0): If the "Total Hours" for the current day are greater than the remaining hours until 40, then the overtime is the difference between the "Total Hours" and the remaining hours until 40. Otherwise, the overtime is 0.
Copy both the "Regular Hours" and "Overtime Hours" formulas down to all rows.
5. Formatting and Presentation
Apply appropriate formatting to make the timesheet easy to read. Use borders to delineate cells. Consider using color-coding (e.g., light gray for weekends) to visually separate days. Format the "Time In" and "Time Out" columns to display time correctly (Format -> Format Cells -> Number -> Time). Ensure all numerical columns (Hours, Minutes) are formatted as numbers with an appropriate number of decimal places.
Add a section at the bottom of the timesheet to summarize the total regular hours and total overtime hours for the week. Use the `SUM` function for this:
- Total Regular Hours: `=SUM(I2:I[last row])` (Replace `[last row]` with the actual last row number)
- Total Overtime Hours: `=SUM(J2:J[last row])`
6. Handling Different Overtime Rules (Optional)
The provided formulas assume overtime is calculated based on a 40-hour work week. However, some companies may have different rules (e.g., daily overtime after 8 hours, weekend overtime). You'll need to modify the formulas accordingly. For example, to implement daily overtime after 8 hours:
First, you still need the cumulative hours calculation as described above. But you will *also* need a column for "Daily Overtime". Insert a new column after "Total Hours" and call it "Daily Overtime". In that column, enter the following formula:
=IF(K2>8,K2-8,0)This formula calculates the daily overtime *before* calculating the weekly overtime. Now, modify the Overtime and Regular Hours columns as follows:
Regular Hours (column I):
=IF(H2>=40,0,IF(K2<=(40-H2),K2-L2,IF((40-H2)>0,(40-H2),0)))(Where L2 is the "Daily Overtime" column)
Overtime Hours (column J):
=L2+IF(H2>=40,K2,IF(K2>(40-H2),K2-(40-H2),0))(Where L2 is the "Daily Overtime" column)
Remember to copy these formulas down the column.
7. Protecting the Template
To prevent accidental changes to formulas, protect the sheet (Review -> Protect Sheet). You can allow users to edit specific ranges (e.g., the data entry columns) while protecting the rest of the sheet.
8. Testing and Refinement
Thoroughly test the timesheet template with various scenarios to ensure the calculations are accurate. Enter sample data, including cases with no overtime, partial overtime, and full overtime. Review the results carefully. Make any necessary adjustments to the formulas until you are confident in the accuracy of the template.
By following these steps, you can create a robust and user-friendly timesheet template in Excel that accurately tracks employee work hours and automatically calculates overtime, saving you time and reducing errors in payroll processing.
```
 629×448 excel timesheet template overtime excel templates from www.exceltemplate123.us
  601×1011 overtime spreadsheet template db excelcom from db-excel.com
  692×287 excel timesheet calculator template from trumpexcel.com
  1516×921 overtime template excel excel templates excel templates from www.exceltemplate123.us
  860×500 editable project timesheet template excel from www.templateral.com
  470×368 overtime calculator excel template excel templates from www.exceltemplate123.us
  1140×1475 overtime spreadsheet overtime overtime spreadsheet template from db-excel.com
  600×600 employee timesheet template excel spreadsheet doctemplates from doctemplates.us
  675×520 excel template tasks overtime sheet from exceldownloads.com
  600×550 overtime sheet templates sample format from www.template.net
  1802×962 overtime template excel template from enterstarcrypticcity.blogspot.com
  1139×641 overtime calculator excel template template from enterstarcrypticcity.blogspot.com
  1650×1275 overtime spreadsheet excel spreadsheet track hours worked from db-excel.com
 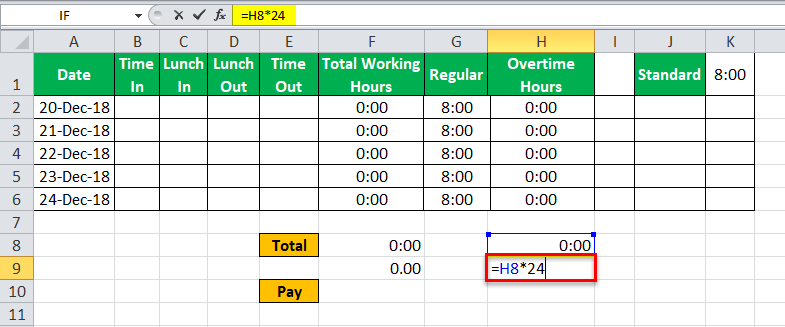 785×327 timesheet excel steps create timesheet calculator from www.wallstreetmojo.com
 How To Create Timesheet Excel Template With Overtime Calculations was posted in November 22, 2025 at 11:47 pm. If you wanna have it as yours, please click the Pictures and you will go to click right mouse then Save Image As and Click Save and download the How To Create Timesheet Excel Template With Overtime Calculations Picture.. Don’t forget to share this picture with others via Facebook, Twitter, Pinterest or other social medias! we do hope you'll get inspired by ExcelKayra... Thanks again! If you have any DMCA issues on this post, please contact us!