How To Merge Cells Without Losing Data In Excel
How To Merge Cells Without Losing Data In Excel - There are a lot of affordable templates out there, but it can be easy to feel like a lot of the best cost a amount of money, require best special design template. Making the best template format choice is way to your template success. And if at this time you are looking for information and ideas regarding the How To Merge Cells Without Losing Data In Excel then, you are in the perfect place. Get this How To Merge Cells Without Losing Data In Excel for free here. We hope this post How To Merge Cells Without Losing Data In Excel inspired you and help you what you are looking for.
Merging Cells in Excel Without Losing Data: A Comprehensive Guide
Merging cells in Microsoft Excel can be a useful formatting tool, allowing you to create visually appealing spreadsheets and clearly label data. However, the standard “Merge & Center” function often leads to data loss, as it typically only preserves the content of the upper-leftmost cell within the selected range, discarding all other data. This can be frustrating and time-consuming, especially when dealing with large datasets. Fortunately, there are several methods to merge cells without sacrificing your valuable information. This guide explores various techniques, providing step-by-step instructions and highlighting potential pitfalls.
Understanding the Challenge: Why Data Loss Occurs
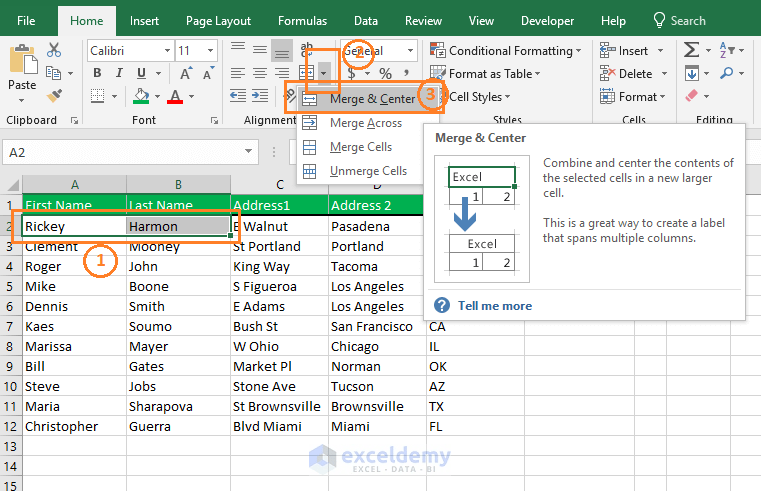
Excel’s default merging behavior stems from its underlying data structure. Each cell is designed to hold a single value. When you merge cells, Excel essentially creates a single larger cell that spans the original selected cells. To maintain data integrity (as Excel interprets it), it prioritizes the value in the top-left cell, considering it the primary value for the newly merged cell. The contents of the other cells are then discarded to avoid ambiguity. Therefore, understanding this fundamental behavior is crucial to preventing unintended data loss.
Method 1: Concatenation and Merge
One of the most reliable methods to merge cells while preserving data involves using the `CONCATENATE` function or the `&` operator to combine the text from multiple cells into a single string before merging. This ensures that all the information is retained within the merged cell.
- Create a Helper Column: Insert a new column adjacent to the columns you want to merge. This column will temporarily hold the combined text.
- Use the CONCATENATE Function or & Operator: In the first cell of the helper column, enter the formula to combine the data from the cells you want to merge. For example, if you want to merge the data in cells A1, B1, and C1, you can use either of the following formulas:
- `=CONCATENATE(A1, ” “, B1, ” “, C1)`
- `=A1&” “&B1&” “&C1`
Note: The `” “` part in the formula adds a space between the values from each cell, making the merged text more readable. You can customize this separator as needed (e.g., use a comma `, ` or a dash `- `).
- Apply the Formula to All Rows: Drag the fill handle (the small square at the bottom-right corner of the cell) down to apply the formula to all the rows you want to merge.
- Copy and Paste as Values: Select the entire helper column and copy its contents. Then, right-click on the first cell of the range you want to merge and select “Paste Special.” Choose “Values” to paste only the text results, not the formulas. This step is crucial because the merged cell cannot contain a formula.
- Merge the Cells: Select the range of cells you want to merge. Go to the “Home” tab, click the “Merge & Center” dropdown, and select “Merge Across” or “Merge Cells,” depending on your desired layout. “Merge Across” is preferable if you are merging cells across rows.
- Optional: Delete the Helper Column: Once you’ve verified that the data is merged correctly, you can delete the helper column.
Method 2: VBA Macro
For more complex or repetitive merging tasks, a VBA (Visual Basic for Applications) macro can automate the process. This is particularly useful when you need to apply the same merging logic across multiple areas of your spreadsheet.
- Open the VBA Editor: Press `Alt + F11` to open the VBA editor.
- Insert a Module: In the VBA editor, go to “Insert” > “Module.”
- Write the Macro Code: Paste the following code into the module:
Sub MergeCellsPreserveData() Dim rng As Range Dim cell As Range Dim MergedText As String Set rng = Selection 'or specify the range directly e.g., Range("A1:C10") For Each cell In rng.Rows MergedText = "" For i = 1 To cell.Cells.Count MergedText = MergedText & cell.Cells(i).Value & " " 'Add space as separator Next i With cell.Cells(1) .Resize(1, cell.Cells.Count).Merge .Value = Trim(MergedText) 'Remove trailing space End With Next cell End Sub - Modify the Code (if needed): The code currently merges cells row by row. If you need to merge columns, you’ll need to adjust the loop accordingly. The `Set rng = Selection` line means the macro will operate on the currently selected cells. You can replace `Selection` with a specific range, such as `Range(“A1:C10”)`.
- Run the Macro: Select the range of cells you want to merge. Go back to the Excel window. Press `Alt + F8` to open the “Macro” dialog box. Select “MergeCellsPreserveData” and click “Run.”
Method 3: Using Power Query (Get & Transform Data)
If you’re dealing with large datasets and need to perform more complex transformations, Power Query offers a powerful solution. While not a direct cell merging tool, it can be used to concatenate data and create a single column that effectively represents the merged data.
- Select Your Data: Select the range of cells you want to merge.
- Create a Table: Go to “Insert” > “Table.” Ensure that “My table has headers” is checked if your data includes headers.
- Load Data into Power Query: Go to “Data” > “From Table/Range.” This opens the Power Query Editor.
- Transform the Data: In the Power Query Editor, select the columns you want to merge. Go to “Transform” > “Merge Columns.”
- Configure the Merge: Choose a separator (e.g., space, comma) and give the new merged column a name.
- Load the Data Back to Excel: Go to “Home” > “Close & Load” > “Close & Load To…” Choose where you want to load the data (e.g., new worksheet).
Important Considerations and Best Practices
- Planning is Key: Before merging cells, carefully consider your spreadsheet’s structure and purpose. Merging can sometimes hinder data analysis and sorting.
- Alternative Formatting: Explore alternative formatting options like adjusting column widths, using borders, or applying cell styles before resorting to merging. Often, these alternatives can achieve the desired visual effect without the drawbacks of merging.
- Data Integrity: Always back up your data before performing any merging operations, especially when using macros or Power Query.
- Testing: Thoroughly test your merging methods on a small sample dataset before applying them to your entire spreadsheet.
- Avoid Over-Merging: Use merging sparingly. Overusing merged cells can make your spreadsheet difficult to work with and can cause issues with formulas and data manipulation.
- Accessibility: Merged cells can sometimes create accessibility issues for users with screen readers. Consider this when designing your spreadsheets.
By understanding the challenges of merging cells in Excel and utilizing the methods described above, you can effectively combine data while preserving your valuable information. Remember to carefully plan your merging strategy and always test your approach before applying it to large datasets.
 761×491 merge cells excel losing data exceldemy from www.exceldemy.com
 How To Merge Cells Without Losing Data In Excel was posted in August 18, 2025 at 6:24 pm. If you wanna have it as yours, please click the Pictures and you will go to click right mouse then Save Image As and Click Save and download the How To Merge Cells Without Losing Data In Excel Picture.. Don’t forget to share this picture with others via Facebook, Twitter, Pinterest or other social medias! we do hope you'll get inspired by ExcelKayra... Thanks again! If you have any DMCA issues on this post, please contact us!