How To Use Named Ranges In Excel For Better Formulas
How To Use Named Ranges In Excel For Better Formulas - There are a lot of affordable templates out there, but it can be easy to feel like a lot of the best cost a amount of money, require best special design template. Making the best template format choice is way to your template success. And if at this time you are looking for information and ideas regarding the How To Use Named Ranges In Excel For Better Formulas then, you are in the perfect place. Get this How To Use Named Ranges In Excel For Better Formulas for free here. We hope this post How To Use Named Ranges In Excel For Better Formulas inspired you and help you what you are looking for.
“`html
Unlocking Excel Formula Power: The Magic of Named Ranges
Excel, at its core, is a powerful tool for data analysis and manipulation. While many users are familiar with basic formulas and functions, a lesser-known feature called Named Ranges can dramatically improve formula readability, maintainability, and overall efficiency. Think of named ranges as assigning meaningful names to individual cells or groups of cells. Instead of referencing cells with cryptic addresses like A1 or B2:B10, you can use descriptive names like Sales, UnitPrice, or ProductList. This makes formulas much easier to understand, debug, and update.
Why Use Named Ranges?
The benefits of using named ranges are numerous:
- Improved Readability: Imagine a formula like
=SUM(Sales)versus=SUM(B2:B10). The first is instantly understandable, while the second requires you to refer back to the spreadsheet to understand whatB2:B10represents. Named ranges make formulas self-documenting, reducing the cognitive load required to understand their purpose. - Enhanced Maintainability: When your data layout changes, you might need to update your formulas. Without named ranges, you’d have to find and modify every instance of the changed cell references. With named ranges, you only need to update the definition of the named range, and all formulas using it will automatically adjust. This significantly reduces the risk of errors and saves valuable time.
- Simplified Formulas: Complex formulas often involve multiple cell references. Named ranges can break down these complex references into manageable, meaningful units, making the overall formula structure clearer and easier to comprehend.
- Reduced Errors: Typing cell references manually can be prone to errors. Using named ranges eliminates this risk, as you simply select the named range from a list, ensuring accuracy.
- Dynamic Formulas: Named ranges can be combined with functions like
OFFSET,INDEX, andCOUNTto create dynamic ranges that automatically adjust based on changes in your data. This allows your formulas to remain accurate even as your data grows or shrinks. - Easier Navigation: Excel’s “Go To” functionality (
Ctrl + GorF5) allows you to quickly navigate to a named range, making it easier to find and inspect specific data sets within your spreadsheet.
Creating Named Ranges
There are several ways to create named ranges in Excel:
- Using the Name Box:
- Select the cell or range of cells you want to name.
- Click in the Name Box (located to the left of the formula bar).
- Type the desired name for the range and press
Enter.
- Using the Define Name Dialog Box:
- Select the cell or range of cells you want to name.
- Go to the Formulas tab on the ribbon.
- Click on Define Name in the Defined Names group.
- In the New Name dialog box, enter the name, specify the scope (workbook or a specific sheet), and confirm the Refers to range.
- Click OK.
- Creating from Selection:
- Select the range of cells, including the header row or column containing the desired names.
- Go to the Formulas tab on the ribbon.
- Click on Create from Selection in the Defined Names group.
- In the Create Names from Selection dialog box, specify the location of the names (Top row, Left column, Bottom row, or Right column).
- Click OK. This will automatically create named ranges based on the labels in the selected row or column.
Naming Conventions
While Excel is relatively flexible with naming conventions, following these guidelines will improve the clarity and consistency of your named ranges:
- Start with a letter: Names must begin with a letter, underscore (
_), or backslash (). - Use letters, numbers, and underscores: Subsequent characters can be letters, numbers, underscores, or periods. Spaces are not allowed.
- Avoid reserved words: Do not use names that resemble cell references (e.g.,
A1,BC123) or reserved words used by Excel (e.g.,Print_Area,Database). - Be descriptive: Choose names that clearly indicate the purpose of the range (e.g.,
TotalRevenueinstead ofData1). - Use camelCase or underscores: If your name consists of multiple words, use camelCase (e.g.,
UnitPrice) or underscores (e.g.,Unit_Price) to improve readability. - Be consistent: Adopt a naming convention and stick to it throughout your workbook.
Using Named Ranges in Formulas
Once you’ve created your named ranges, using them in formulas is simple. Just type the name of the range directly into the formula, and Excel will automatically recognize and use it. For example:
=SUM(Sales): Sums the values in the named range “Sales”.=AVERAGE(UnitPrice): Calculates the average of the values in the named range “UnitPrice”.=VLOOKUP(ProductCode, ProductList, 2, FALSE): Performs a VLOOKUP using the named range “ProductList” as the lookup table.
When typing a formula, Excel often provides a dropdown list of available named ranges as you type, making it easy to select the correct range and avoid typos.
Managing Named Ranges
You can manage your named ranges using the Name Manager dialog box. To access it, go to the Formulas tab and click on Name Manager in the Defined Names group. The Name Manager allows you to:
- View all named ranges: See a complete list of all named ranges in your workbook, along with their values and the cells they refer to.
- Edit named ranges: Change the name, scope, or refers to range of an existing named range.
- Delete named ranges: Remove a named range that is no longer needed.
- Filter named ranges: Filter the list to show only named ranges defined for the workbook or a specific sheet.
Dynamic Named Ranges
As mentioned earlier, named ranges can be combined with functions like OFFSET, INDEX, and COUNT to create dynamic ranges that automatically adjust based on the data in your worksheet. This is particularly useful when dealing with data that is constantly being updated. For example:
Suppose you have a list of sales figures that grows each month. You can create a dynamic named range called DynamicSales using the OFFSET function. This named range will automatically adjust to include all the sales figures, even as new data is added. The “Refers to” field in the Name Manager might contain a formula like:
=OFFSET(Sheet1!$A$1,0,0,COUNTA(Sheet1!$A:$A),1)
This formula defines a range that starts at cell A1 and extends down to the last non-empty cell in column A. This ensures that the `DynamicSales` range always includes all the sales data.
Conclusion
Named ranges are an invaluable tool for any Excel user who wants to create more readable, maintainable, and efficient spreadsheets. By taking the time to learn and implement named ranges, you can significantly improve your Excel skills and streamline your workflow. Embrace the power of named ranges and unlock the full potential of your Excel formulas!
“`
 768×420 reasons named ranges excel formulas from howtoexcelatexcel.com
 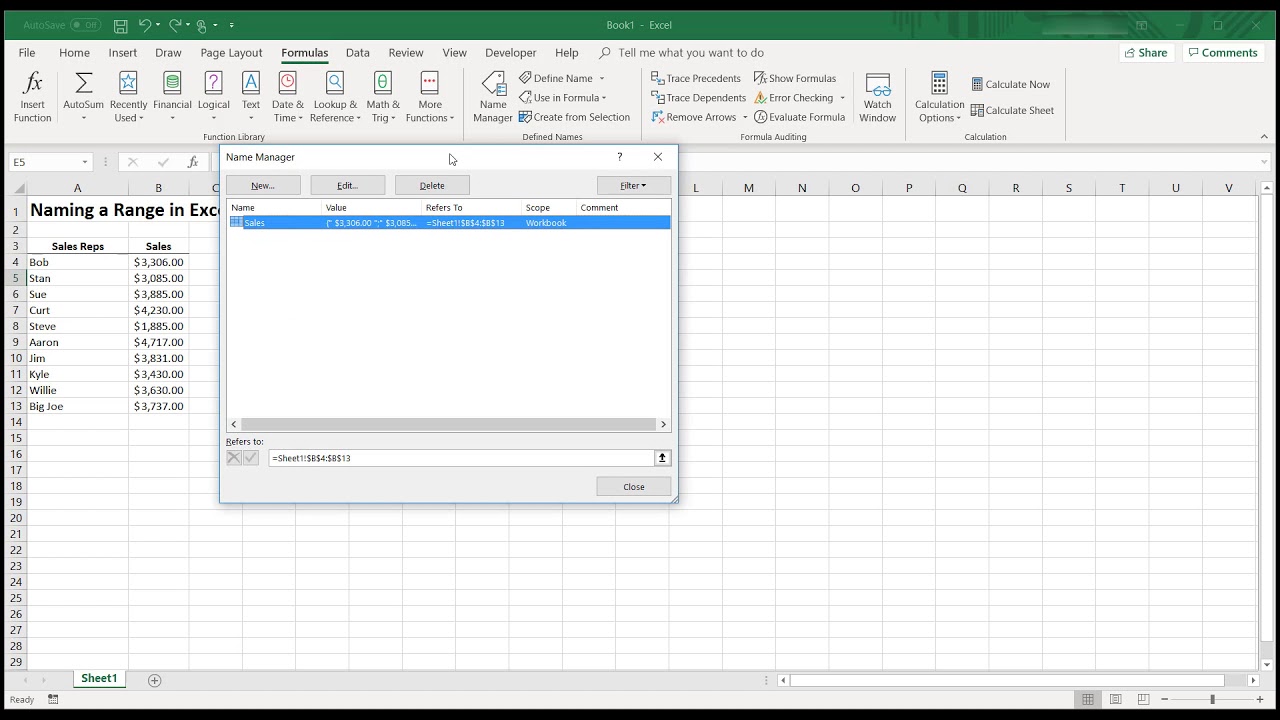 1280×720 named ranges excel excelbuddycom from excelbuddy.com
 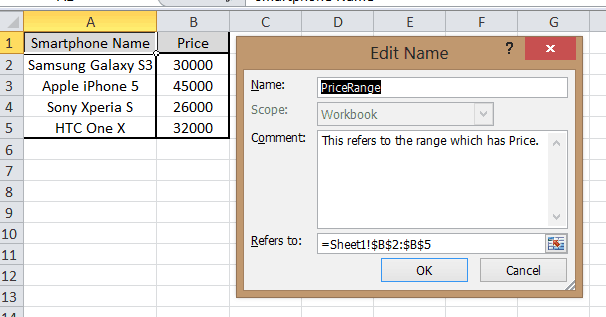 606×317 formulas excel named ranges tech touch from www.tech2touch.com
  1024×519 named ranges existing excel formulas company rocks from www.thecompanyrocks.com
 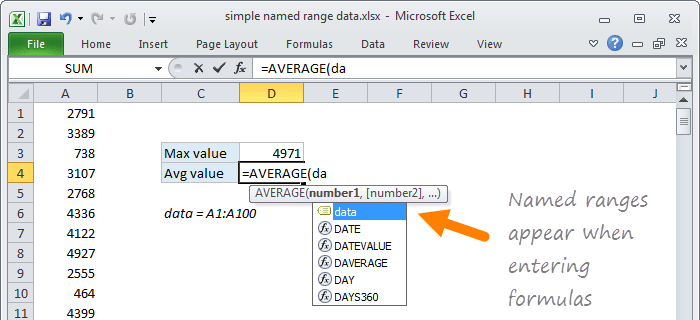 700×320 named ranges excel exceljet from exceljet.net
  1044×542 reasons create named ranges excel formulas from www.thecompanyrocks.com
 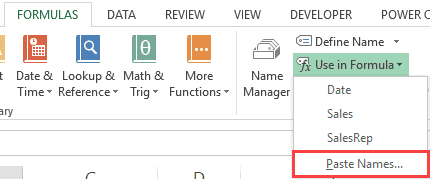 430×179 create named ranges excel step step guide from trumpexcel.com
  950×472 examples named ranges excel chris menard training from chrismenardtraining.com
  678×433 ms excel add named range from www.techonthenet.com
  300×300 named ranges excel from www.computerimages.com
 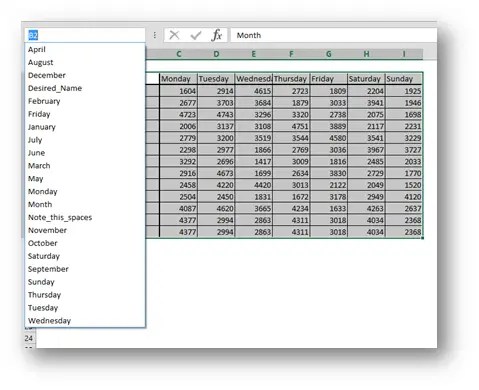 479×390 named ranges excel excel unpluggedexcel unplugged from excelunplugged.com
  590×393 excel named ranges explained training hub from www.myonlinetraininghub.com
  418×192 named ranges microsoft excel pinoy tutorials tips tricks from omelsoft.blogspot.com
  0 x 0 creating modifying named ranges excel lesson studycom from study.com
 How To Use Named Ranges In Excel For Better Formulas was posted in January 20, 2026 at 6:38 am. If you wanna have it as yours, please click the Pictures and you will go to click right mouse then Save Image As and Click Save and download the How To Use Named Ranges In Excel For Better Formulas Picture.. Don’t forget to share this picture with others via Facebook, Twitter, Pinterest or other social medias! we do hope you'll get inspired by ExcelKayra... Thanks again! If you have any DMCA issues on this post, please contact us!