How To Use Nested If Statements In Excel
How To Use Nested If Statements In Excel - There are a lot of affordable templates out there, but it can be easy to feel like a lot of the best cost a amount of money, require best special design template. Making the best template format choice is way to your template success. And if at this time you are looking for information and ideas regarding the How To Use Nested If Statements In Excel then, you are in the perfect place. Get this How To Use Nested If Statements In Excel for free here. We hope this post How To Use Nested If Statements In Excel inspired you and help you what you are looking for.
Here’s an explanation of nested IF statements in Excel, formatted for HTML display: “`html
Mastering Nested IF Statements in Excel
Excel’s IF function is a cornerstone of conditional logic, allowing you to perform different calculations or display different results based on whether a specified condition is true or false. While a single IF function is powerful, its capabilities are greatly expanded when you nest IF functions within each other. This allows you to handle multiple conditions and create more complex decision-making processes within your spreadsheets.
What is a Nested IF Statement?
A nested IF statement is simply an IF function placed inside another IF function. Specifically, the second (or third, fourth, etc.) IF function becomes the value_if_false argument of the preceding IF function. This structure enables you to test a sequence of conditions, one after another, until a true condition is found or all conditions are exhausted, leading to a final default result.
Think of it like a decision tree. The first IF statement acts as the root. If the condition is true, the corresponding value is returned. If the condition is false, the logic branches to the nested IF, which performs its own condition test and potentially branches further. This branching continues until a true condition is found or a final ‘else’ value is reached.
The Basic Syntax
The general syntax of a nested IF statement looks like this:
=IF(condition1, value_if_true1, IF(condition2, value_if_true2, IF(condition3, value_if_true3, value_if_false_all)))Let’s break down the components:
IF(condition1, value_if_true1, ... ): This is the outermost IF function.condition1: This is the first condition you want to test. It can be a comparison (e.g., A1 > 10), a logical test (e.g., AND(B1=”Yes”, C1<5)), or a cell reference containing a TRUE/FALSE value.value_if_true1: The value that is returned ifcondition1is TRUE. This can be a number, text string (enclosed in quotes), a formula, or a cell reference.IF(condition2, value_if_true2, ... ): This is the nested IF function. It’s placed as thevalue_if_falseargument of the first IF. It follows the same structure as the outer IF.condition2: The second condition to test, evaluated only ifcondition1is FALSE.value_if_true2: The value returned ifcondition2is TRUE.value_if_false_all: The final value returned if *all* the preceding conditions are FALSE. This acts as a default “else” case.
A Practical Example: Grading System
Imagine you’re creating a grading system where a student’s grade is determined by their score:
- 90 or above: A
- 80-89: B
- 70-79: C
- 60-69: D
- Below 60: F
Here’s how you can achieve this using a nested IF statement, assuming the student’s score is in cell A1:
=IF(A1>=90, "A", IF(A1>=80, "B", IF(A1>=70, "C", IF(A1>=60, "D", "F"))))Let’s walk through how this formula works:
- The first IF checks if A1 is greater than or equal to 90. If it is, the formula returns “A”.
- If A1 is less than 90, the logic moves to the next IF, which checks if A1 is greater than or equal to 80. If it is, the formula returns “B”.
- This pattern continues until either a condition is met and a grade is returned, or all conditions are false.
- If A1 is less than 60 (all previous conditions are false), the final “F” is returned.
Tips for Effective Nested IF Statements
While nested IFs are powerful, they can quickly become difficult to read and debug if not structured carefully. Here are some best practices:
- Start with the Most Likely Condition: Arrange your conditions from most likely to least likely to improve performance. If the most frequent condition is evaluated first, the formula might not need to evaluate the nested IFs at all, saving processing time.
- Use Consistent Formatting: Indent the nested IFs to visually represent the logical structure. This makes the formula easier to understand and maintain. Excel’s formula editor doesn’t automatically format this way, but you can manually add line breaks and spaces for clarity.
- Consider Alternative Functions: For situations with many conditions, consider using
VLOOKUP,HLOOKUP,INDEXandMATCH, orIFS(available in newer versions of Excel). These functions can often provide a more concise and readable solution. The IFS function, in particular, is designed specifically for handling multiple conditions and simplifies the syntax considerably. - Break Down Complex Logic: If your nested IF statement is getting excessively long and complicated, consider breaking down the logic into smaller, more manageable parts. You could use helper columns to perform intermediate calculations or create named ranges to represent complex conditions.
- Thoroughly Test Your Formula: Test your nested IF statement with a wide range of input values to ensure it produces the correct results in all scenarios. Pay close attention to boundary conditions (e.g., scores exactly at the cutoff points for grades).
Limitations and Alternatives
While nested IFs are valuable, they have limitations:
- Readability: Deeply nested IF statements can become very difficult to read and understand, especially for others who might need to work with your spreadsheet.
- Maintainability: Modifying a complex nested IF statement can be error-prone.
- Excel Version Limits: Older versions of Excel have a limit on the number of nested IF functions allowed (typically 7 levels). Newer versions have significantly increased this limit, but readability remains a concern.
Alternatives to nested IF statements include:
- IFS Function (Excel 2016 and later): This function simplifies multiple condition checks. The syntax is
=IFS(condition1, value_if_true1, condition2, value_if_true2, ..., value_if_no_conditions_are_true). It’s generally much easier to read than nested IFs. - VLOOKUP/HLOOKUP: These functions are excellent for looking up values in a table based on a specific criteria. They are particularly useful when you have a defined set of conditions and corresponding results.
- INDEX and MATCH: This combination provides more flexibility than VLOOKUP/HLOOKUP. MATCH finds the position of a value in a range, and INDEX returns the value at that position in another range.
- CHOOSE: This function returns a value from a list based on an index number. It’s useful when you have a series of sequential choices.
- Helper Columns: Breaking down complex logic into multiple columns can improve readability and maintainability.
Conclusion
Nested IF statements are a powerful tool for implementing conditional logic in Excel. By understanding their syntax, best practices, and limitations, you can effectively use them to create sophisticated spreadsheets that perform complex calculations and decision-making. However, always consider alternative functions and techniques to improve readability and maintainability, especially when dealing with a large number of conditions. The IFS function and lookup functions are often preferable options for complex scenarios.
“`
 1366×684 excel statements part nested statements learn excel from www.learnexcelnow.com
  1080×1080 nested statements excel ashley from www.excelbyashley.com
  943×537 vba nested automate excel from www.automateexcel.com
  1280×600 nested statements microsoft office excel microsoft from ms-office.wonderhowto.com
  511×509 nested formula excel nested formula from www.educba.com
  1170×804 nestedif professor excel professor excel from professor-excel.com
 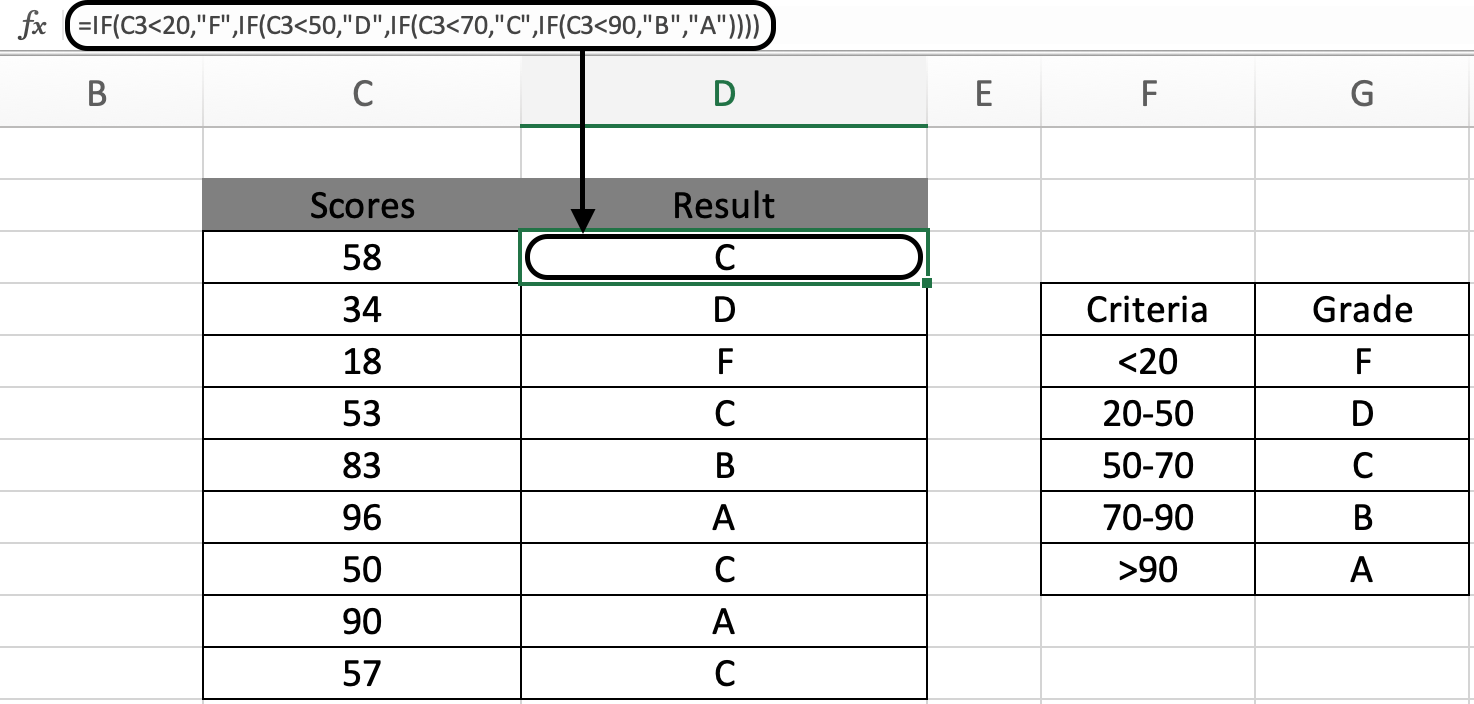 1474×704 nested function excel from www.exceltip.com
  685×204 excel nested function syntax examples from www.wallstreetmojo.com
 How To Use Nested If Statements In Excel was posted in August 9, 2025 at 8:45 am. If you wanna have it as yours, please click the Pictures and you will go to click right mouse then Save Image As and Click Save and download the How To Use Nested If Statements In Excel Picture.. Don’t forget to share this picture with others via Facebook, Twitter, Pinterest or other social medias! we do hope you'll get inspired by ExcelKayra... Thanks again! If you have any DMCA issues on this post, please contact us!