How To Protect Specific Cells In Excel Sheet
How To Protect Specific Cells In Excel Sheet - There are a lot of affordable templates out there, but it can be easy to feel like a lot of the best cost a amount of money, require best special design template. Making the best template format choice is way to your template success. And if at this time you are looking for information and ideas regarding the How To Protect Specific Cells In Excel Sheet then, you are in the perfect place. Get this How To Protect Specific Cells In Excel Sheet for free here. We hope this post How To Protect Specific Cells In Excel Sheet inspired you and help you what you are looking for.
Protecting Specific Cells in Excel
Microsoft Excel is a powerful tool for data analysis and management, often used in collaborative environments. While collaboration is beneficial, it also necessitates protecting sensitive data from accidental or intentional modification. Excel’s protection features allow you to lock down specific cells or ranges while leaving others editable. This granular control ensures data integrity and prevents unauthorized changes. This guide provides a detailed, step-by-step walkthrough of how to protect specific cells in an Excel sheet.
Understanding Excel Protection
Before diving into the process, it’s essential to understand how Excel’s protection mechanism works. Excel protection is a two-step process:
- Locking/Unlocking Cells: By default, all cells in an Excel worksheet are locked. However, this locking only takes effect when sheet protection is enabled. Before enabling sheet protection, you need to specify which cells should *not* be locked (i.e., those you want to remain editable).
- Enabling Sheet Protection: This is the final step that activates the cell locking you configured in the previous step. When sheet protection is enabled, locked cells become uneditable, and users can only modify the unlocked cells.
Step-by-Step Guide to Protecting Specific Cells
Here’s a comprehensive guide to protect specific cells in your Excel worksheet:
1. Select the Cells You Want to Leave Editable
First, identify the cells or ranges that you want users to be able to edit even after protection is enabled. These are the cells that will remain unlocked.
- Individual Cells: Click on each cell while holding down the Ctrl key.
- Ranges: Click and drag your mouse to select a contiguous range of cells. You can also select a range by entering its cell addresses in the Name Box (e.g., “A1:B10”) and pressing Enter.
- Non-Contiguous Ranges: Select the first range, then hold down the Ctrl key and select subsequent ranges.
- Entire Columns/Rows: Click on the column letter or row number to select the entire column or row, respectively. To select multiple columns or rows, click and drag across the column letters or row numbers, or hold down Ctrl/Shift while clicking.
2. Unlock the Selected Cells
With the cells you want to keep editable selected, you need to unlock them.
- Right-Click: Right-click on any of the selected cells.
- Format Cells: Choose “Format Cells…” from the context menu. This opens the Format Cells dialog box.
- Protection Tab: In the Format Cells dialog box, navigate to the “Protection” tab.
- Uncheck “Locked”: Uncheck the “Locked” checkbox. By default, this box is checked, meaning the cells are initially locked. Unchecking it unlocks them.
- Click “OK”: Click the “OK” button to apply the changes and close the Format Cells dialog box.
Now, the cells you selected are unlocked, meaning they will be editable even after sheet protection is enabled.
3. Enable Sheet Protection
This is the final step that activates the cell locking.
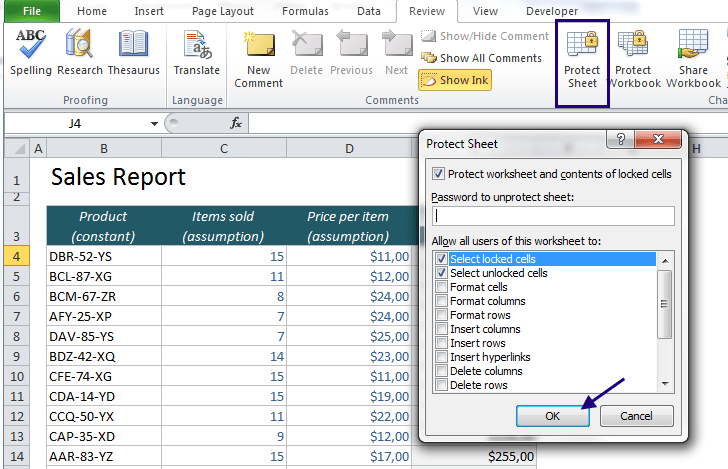
- Review Tab: Go to the “Review” tab on the Excel ribbon.
- Protect Sheet: Click on the “Protect Sheet” button in the “Protect” group. This opens the “Protect Sheet” dialog box.
- Password (Optional): Enter a password in the “Password to unprotect sheet” box if you want to require a password to remove the protection later. Important: If you lose the password, you will not be able to unprotect the sheet and modify the locked cells. Consider storing the password in a safe place or using a password manager. Leaving the password field blank means anyone can unprotect the sheet.
- Allow Users to: This section lets you specify what actions users are allowed to perform on the protected sheet. The default options typically include “Select locked cells” and “Select unlocked cells.” You can customize these permissions by checking or unchecking the corresponding boxes. For example, you might allow users to sort or filter data even though they can’t directly edit locked cells. Common options include:
- Select locked cells: Allows users to select locked cells.
- Select unlocked cells: Allows users to select unlocked cells.
- Format cells: Allows users to change the formatting of cells (e.g., font, color, alignment). This will only apply to unlocked cells if the sheet is protected.
- Format columns: Allows users to change the formatting of columns. This will only apply to unlocked columns if the sheet is protected.
- Format rows: Allows users to change the formatting of rows. This will only apply to unlocked rows if the sheet is protected.
- Insert columns: Allows users to insert new columns.
- Insert rows: Allows users to insert new rows.
- Insert hyperlinks: Allows users to insert hyperlinks.
- Delete columns: Allows users to delete columns.
- Delete rows: Allows users to delete rows.
- Sort: Allows users to sort data within the sheet.
- Filter: Allows users to apply filters to data.
- Use PivotTable reports: Allows users to interact with PivotTable reports.
- Edit objects: Allows users to edit graphic objects.
- Edit scenarios: Allows users to edit scenarios.
- Click “OK”: Click the “OK” button.
- Confirm Password (If Applicable): If you entered a password, you will be prompted to confirm it. Re-enter the password and click “OK”.
The sheet is now protected. Users can only edit the cells you unlocked in step 2. Attempting to edit a locked cell will display a message indicating that the cell is protected.
4. Unprotecting the Sheet
To unprotect the sheet and make all cells editable again, follow these steps:
- Review Tab: Go to the “Review” tab on the Excel ribbon.
- Unprotect Sheet: The “Protect Sheet” button will now be labeled “Unprotect Sheet.” Click on it.
- Enter Password (If Applicable): If you set a password, you will be prompted to enter it. Enter the correct password and click “OK”.
The sheet is now unprotected, and all cells are editable.
Tips and Best Practices
- Document Your Protection: Keep a record of which cells are unlocked and why. This will be helpful for future reference and maintenance.
- Use Clear Naming Conventions: Use meaningful names for unlocked ranges to easily identify them. You can do this using Excel’s Name Manager (Formulas tab -> Defined Names -> Name Manager).
- Test Your Protection: After enabling sheet protection, thoroughly test it to ensure that the correct cells are editable and that the locked cells are indeed protected.
- Consider VBA: For more complex protection scenarios, consider using VBA (Visual Basic for Applications) to automate the process or implement more advanced security measures.
- Password Security: Choose strong, unique passwords if you opt to use them. Avoid using easily guessable passwords. Remember that lost passwords cannot be recovered.
- Educate Users: If you are sharing the spreadsheet with others, inform them about the protected cells and the reasons for the protection. This can help prevent accidental attempts to modify protected cells.
Conclusion
Protecting specific cells in Excel is a crucial step in ensuring data integrity and preventing unauthorized modifications. By following the steps outlined in this guide, you can effectively control which parts of your spreadsheet are editable, maintaining the accuracy and reliability of your data while allowing for collaborative editing where appropriate.
 728×469 protect cells excel easy excelcom from easy-excel.com
 How To Protect Specific Cells In Excel Sheet was posted in July 30, 2025 at 7:43 pm. If you wanna have it as yours, please click the Pictures and you will go to click right mouse then Save Image As and Click Save and download the How To Protect Specific Cells In Excel Sheet Picture.. Don’t forget to share this picture with others via Facebook, Twitter, Pinterest or other social medias! we do hope you'll get inspired by ExcelKayra... Thanks again! If you have any DMCA issues on this post, please contact us!